CORE Control
Create TwinCAT3 Project for CORE Module
Create TwinCAT 3 Project
- Select "New TwinCAT Project …" via the Start page.
- Alternatively, a new project can be created by clicking on File ⇨ New ⇨ Project (All existing project templates are displayed)
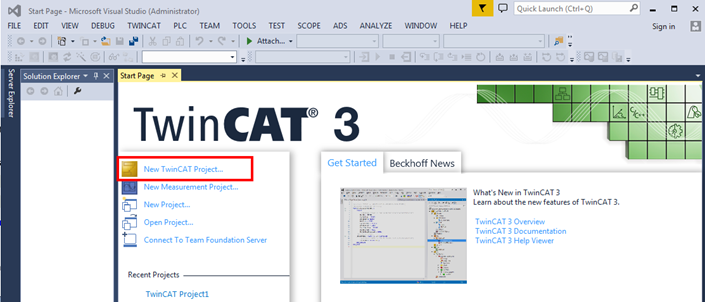 Figure 1. TwinCAT3 - New Project
- Select "TwinCAT XAE Project"; a suitable project name can optionally be entered.
- Click on "OK".
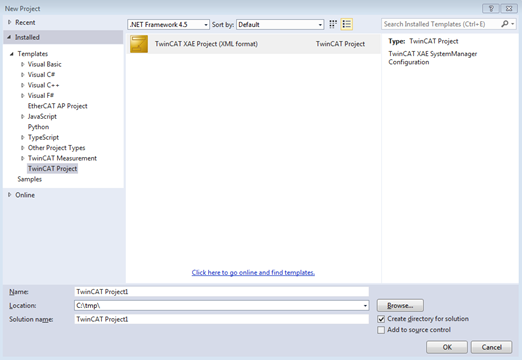
Figure 2. TwinCAT3 - Project Configuration
Create TwinCAT3 C++ Module
- Right-click on "C++" and select "Add New Item..."
- If the green C++ symbol is not listed, this means that either a target device doesn't support TwinCAT C++ or the current Visual Studio is not C++-capable.

Figure 3. TwinCAT3 Project - Add C++ Project
- If the green C++ symbol is not listed, this means that either a target device doesn't support TwinCAT C++ or the current Visual Studio is not C++-capable.
- Select "TwinCAT Driver Project", optionally enter a related project name (e.g. CORE Controller) and click on "OK".

Figure 4. TwinCAT3 Project - C++ Project Configuration - Select "TwinCAT Module Class with Cyclic I/O" and click on "OK".
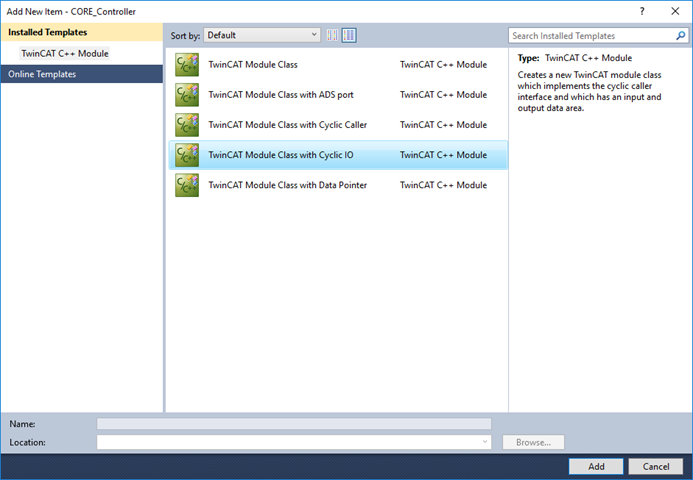
Figure 5. TwinCAT3 Project - C++ Module Categories - Enter a module name in the dialog window "TwinCAT Class Wizard" (E.g. CoreModule)

Figure 6. TwinCAT3 Project - C++ Module Configuration
Create TwinCAT3 C++ Module Instance
- Right-click on the C++ project (in this case "Untitled1") and select "Add New Item...“
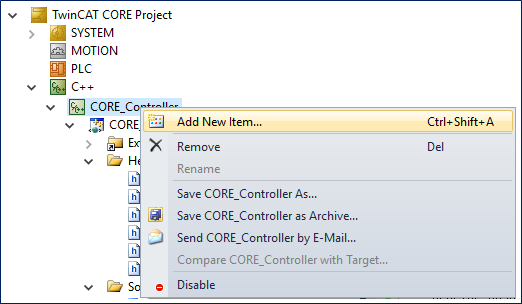
Figure 7. TwinCAT3 C++ Module - Add Module Instance - Select a C++ module to create its instance
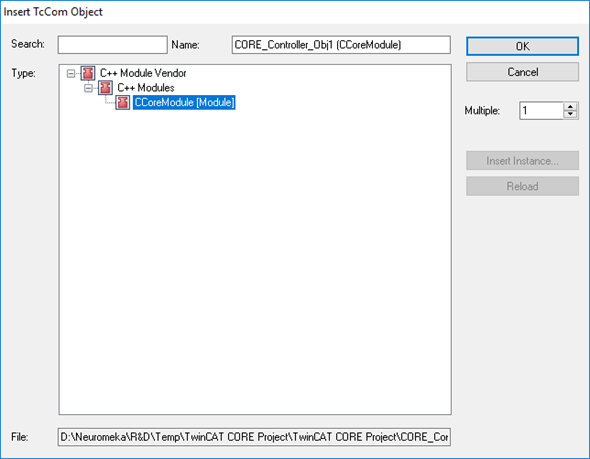
Figure 8. TwinCAT3 C++ Module - Select Module for Instantiation - The module already provides a simple I/O interface with default variables in each case:
- Input area: Value, Status, Data
- Output area: Value, Control, Data

Figure 9. TwinCAT3 C++ Module - Default Data Variables
- The description of those variables is defined in
- TwinCAT Module Configuration file (e.g. "CORE_Controller.tmc")

Figure 10. TwinCAT3 C++ Module - Modify Data Variables
- TwinCAT Module Configuration file (e.g. "CORE_Controller.tmc")
- Modify the list of variables as below to work with CORE module:
- Input area: statusword, modeOpDisp, actPos, actVel, actTorq
- Output area: controlword, modeOp, tarTorq

Figure 11. TwinCAT3 C++ Module - Modify Data Variables
System Scanning & Mapping
-
Scan devices
- Right click on Device ⇨ Scan.
- Then, every module will be displayed.

Figure 12. TwinCAT3 Project - Scan for CORE ModuleNote: Before scanning, the ESI file for CORE module must be added to proper TwinCAT location. Also, the TwinCAT driver must be installed for Network Interface Card (NIC) Please refer to "Setting tips" section for guideline.
-
Map data entries
- Double click to each variable in CoreModule ⇨ Linked to ⇨ Select object link to ⇨ Click on OK.
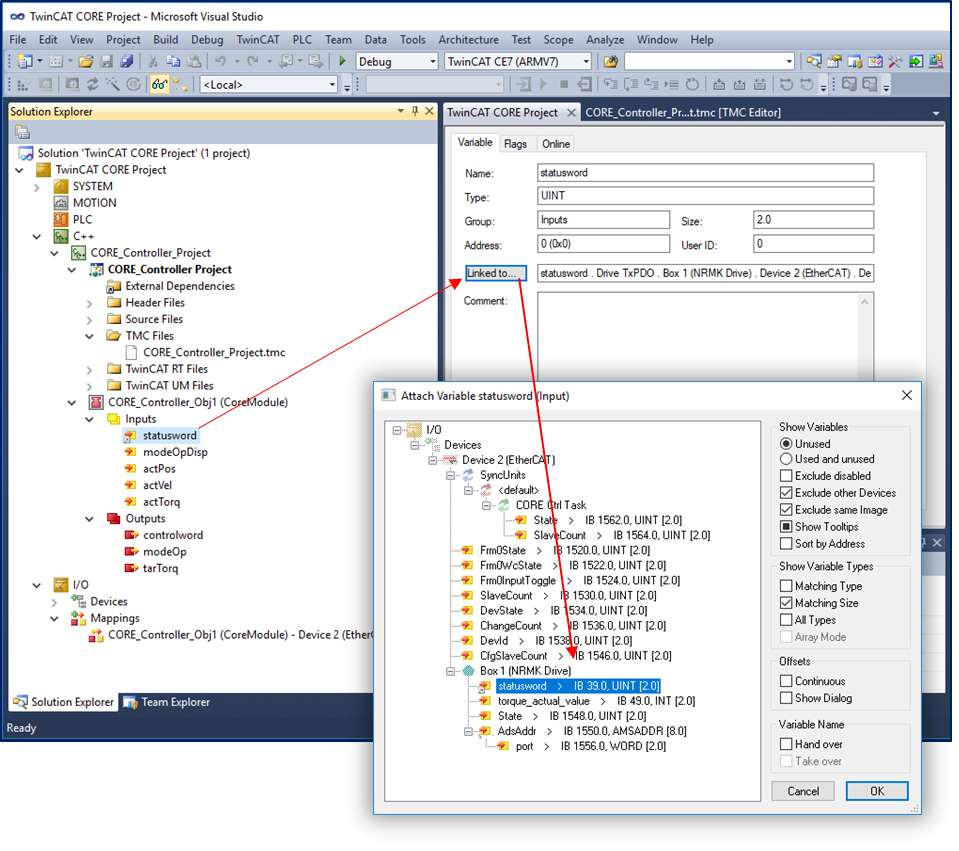
Figure 13. TwinCAT3 Project - Map Data Variables for CORE Module - Right click on Mapping ⇨ Generate Mapping
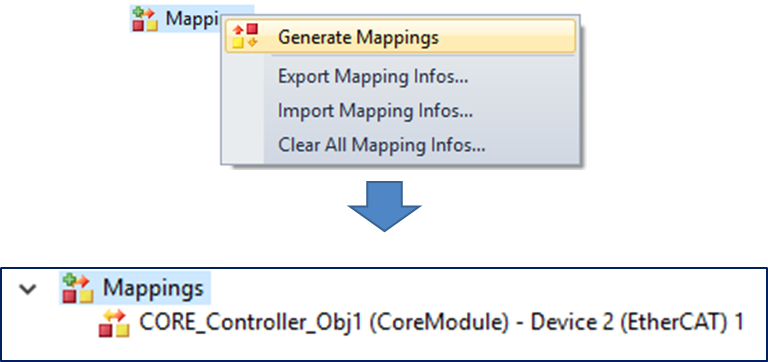
Figure 14. TwinCAT3 Project - Generate Data Mapping
- Double click to each variable in CoreModule ⇨ Linked to ⇨ Select object link to ⇨ Click on OK.
Implementing TwinCAT 3 C++ project
- Open "Module1.cpp" in this example
- The Module1::CycleUpdate() method is cyclically called
- This is where the cyclic code is implemented.
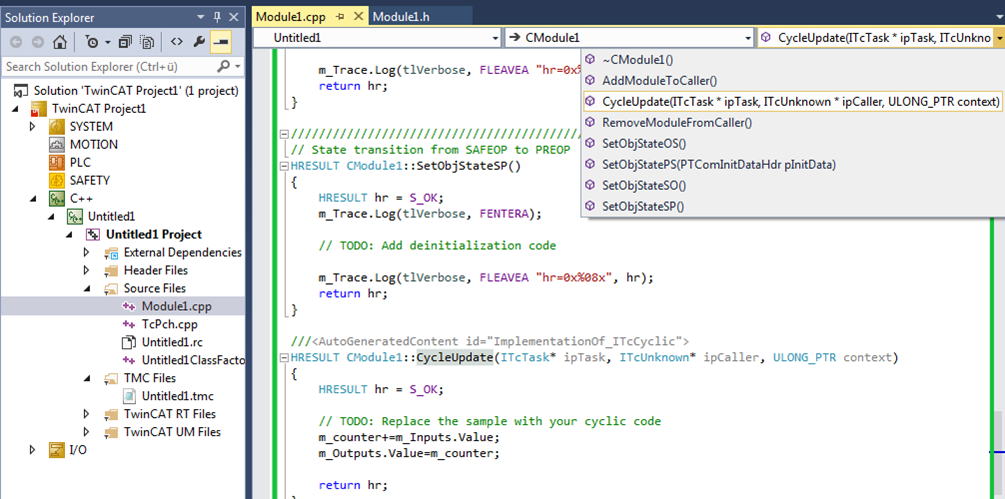 Figure 15. TwinCAT3 C++ Module - Cyclic Function for Real-time Task
Note: The drop-down menu at the top of the editor can be used for navigation through the Module class.
- This is where the cyclic code is implemented.
Compiling TwinCAT 3 C++ project
- Select the target platform according to which the compilation should be carried out
- Right-click on the TwinCAT 3 C++ project and select "Build" or "Rebuild"
- Compilation of the x64 driver generates the following output

Figure 16. TwinCAT3 C++ Module - Build the C++ Source Code
Create a TwinCAT real-time task
- Open System ⇨ Right-click on Tasks ⇨ Select Add New Item...

Figure 17. TwinCAT3 Project - Add Real-time Task - Enter a unique name for the task (e.g. Task1)
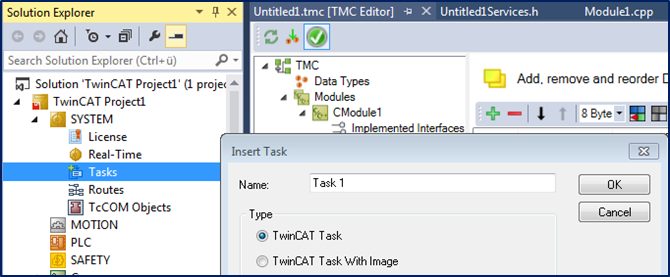
Figure 18. TwinCAT3 Project - Specify Task Name - Configure the task
- "Auto start" must be activated in order to automatically start a task that is cyclically executed.
- "Cycle ticks" defines the timing of the clock in relation to the basic clock.

Figure 19. TwinCAT3 Project - Real-time Task Configuration
- Assigning the task to C++ module
- Select the C++ Module instance in the solution tree
- Select the "Context" tab in the right-hand working area
- Select the "Task 1" in the drop-down task menu
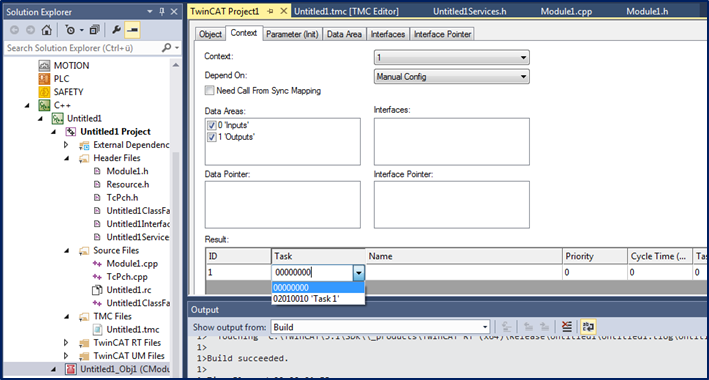
Figure 20. TwinCAT3 Project - Assign Task to C++ Module
Enable TwinCAT 3 C++ Debugger
- Select the "C++ Debugger" tab on the C++ node of the solution, switch on "Enable C++ Debugger"

Figure 21. TwinCAT3 C++ Module - Enable Debugging Mode
Activating a TwinCAT 3 project
- Click on "Activate Configuration“
- All required files for the TwinCAT project are transferred to the target system
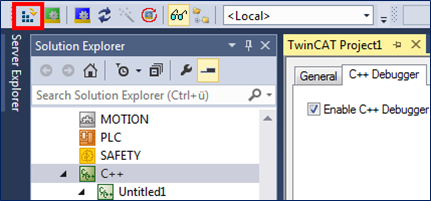
Figure 22. TwinCAT3 Project - Activate System
- All required files for the TwinCAT project are transferred to the target system
- Confirm the activation of the new configuration
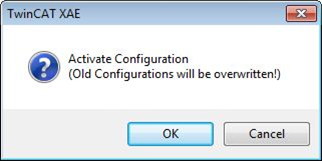
Figure 23. TwinCAT3 Project - Confirm System Activation - You will be offered the option to create a 7-day test license if needed. This can be repeated any number of times.
- TwinCAT 3 will ask whether the mode should be switched to Run Mode.
- Click on "OK" to switches TwinCAT to Run Mode
- Click on "Cancel" to remain in Config Mode
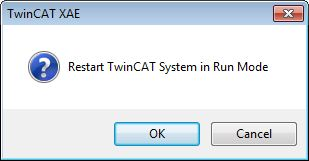
Figure 24. TwinCAT3 Project - Confirm System's Run Mode
- After switching to Run mode, the TwinCAT System Service symbol at the bottom in Visual Studio turns Green.

Figure 25. TwinCAT3 Project - Run Mode Indication
