C# 응용 예제
사용자가 NURI SDK 를 활용하여, 다른 언어 환경에서 사용하고자 하는 경우를 위해 단계별 가이드를 제공합니다.
프로젝트 생성 및 구성하기
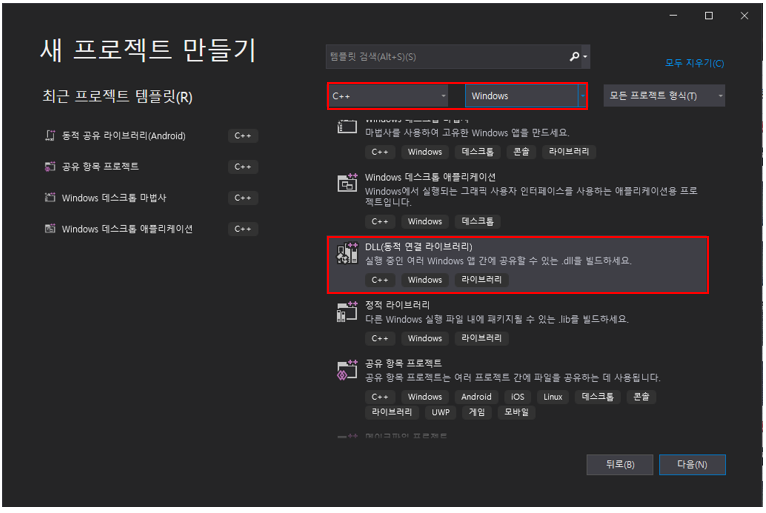
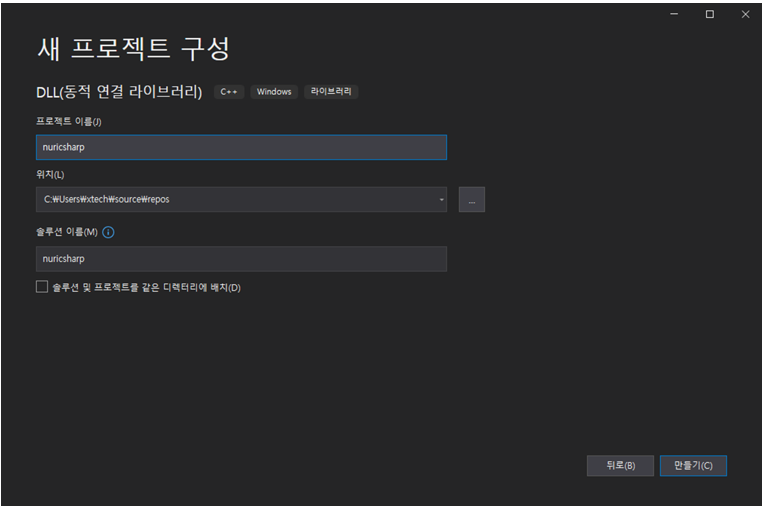
C# 에서 C++ 라이브러리를 사용하기 위해서는 동적연결 라이브러리로 프로젝트를 생성해야합니다. 프로젝트 이름은 추후 사용할 라이브러리의 이름이 됩니다.
새 프로젝트 생성 창에서 C++/Windows -> DLL(동적 연결 라이브러리) 를 선택하여 프로젝트를 생성합니다.
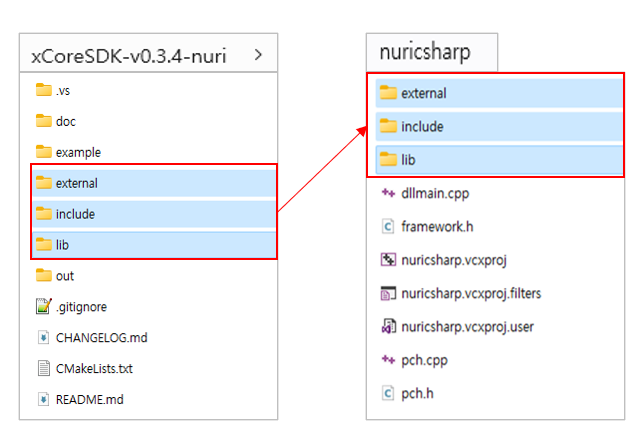
프로젝트 생성이 완료되었으면, 해당 솔루션이 만들어진 폴더 내부에 NURI SDK 에 선언되어 있는 C++ 함수들을 사용하기 위해 아래 그림과 같이 기존 NURI SDK 내부에 있던 external, include, lib 폴더를 복사하여 붙여넣습니다.
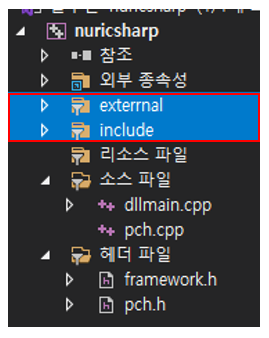
이후 솔루션 내에도 붙여넣은 폴더들을 추가합니다.
솔루션 속성 설정
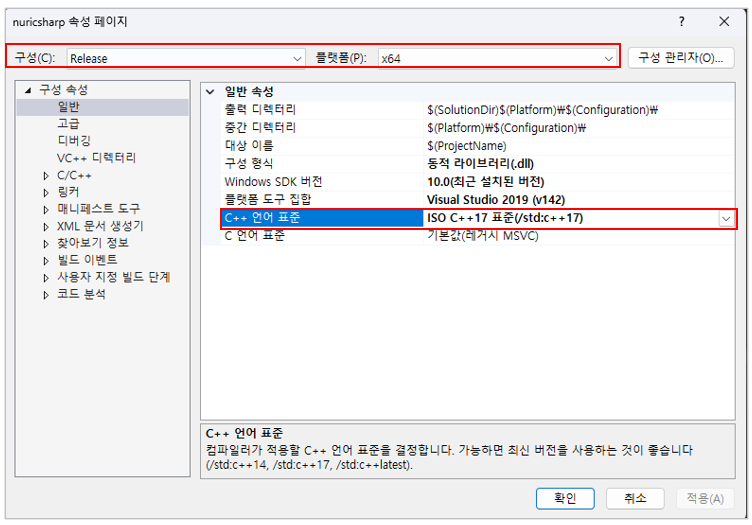
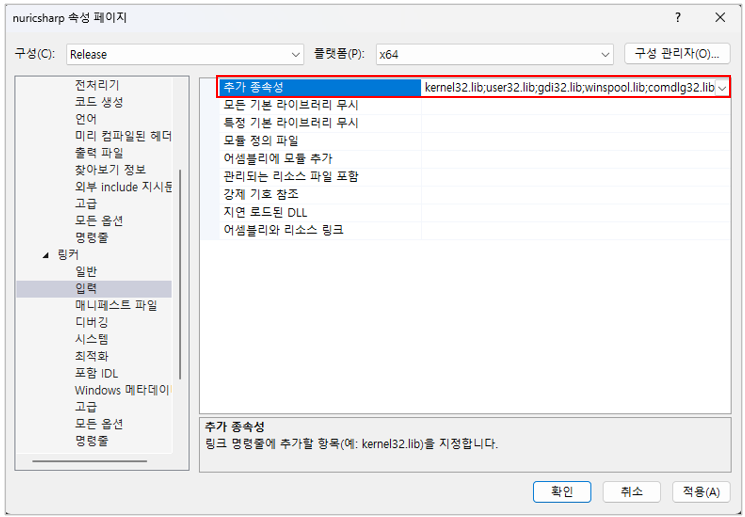
프로젝트 내에 필요한 파일 및 폴더를 추가했다면, 빌드를 위한 솔루션 속성을 설정합니다. 구성 환경은 Release 또는 Debug 상관 없지만, NURI SDK는 64bit 환경에서 빌드된 라이브러리 이므로, 플랫폼은 x64 로 설정해주어야 합니다. 아래 설정 방법은 구성 환경은 Release, 플랫폼은 x64 인 상황에서의 설정 방법입니다.
- 구성 속성 -> 일반 -> C++ 언어 표준 -> ISO C++17 표준(/std:c++17)
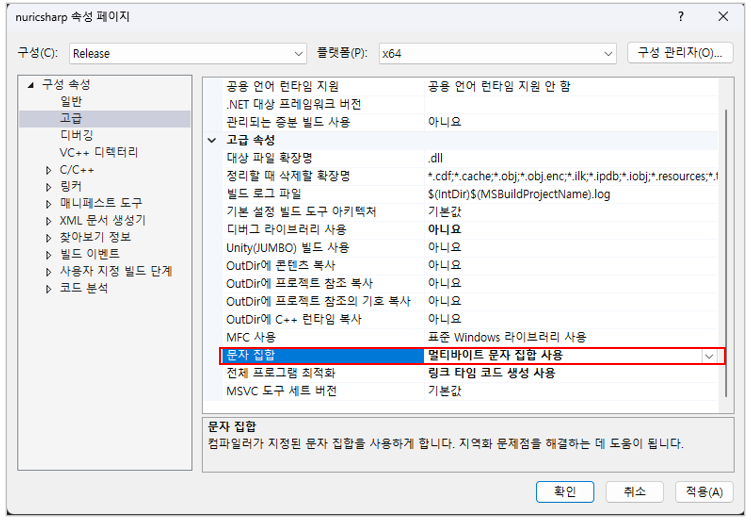
- 구성 속성 -> 고급 -> 문자집합 -> 멀티바이트 문자 집합 사용
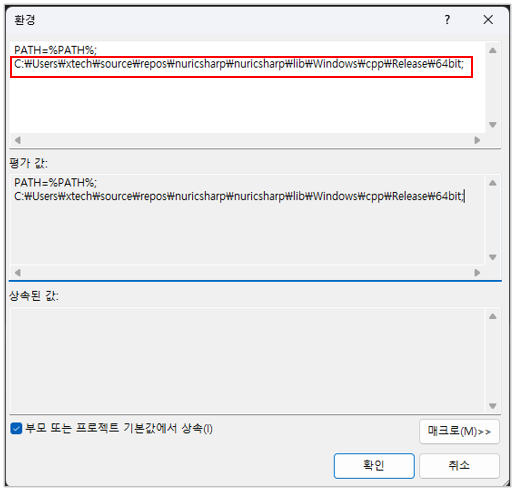
- 구성 속성 -> 디버깅 -> 환경 -> 프로젝트 경로\lib\Windows\cpp\Release\64bit;
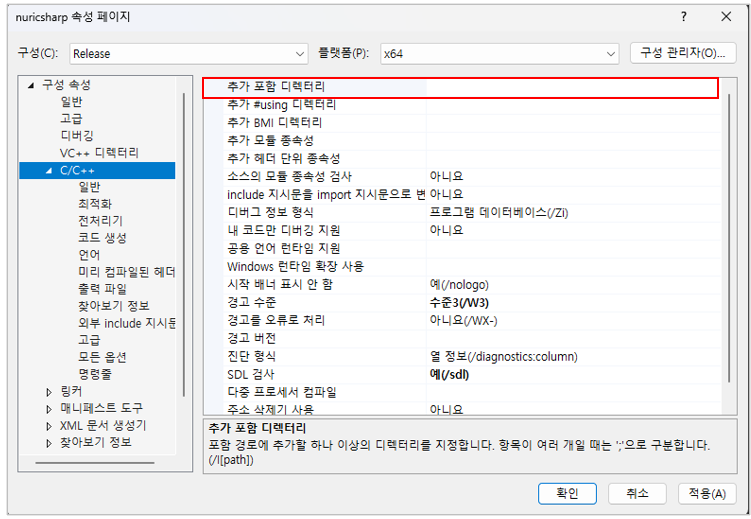
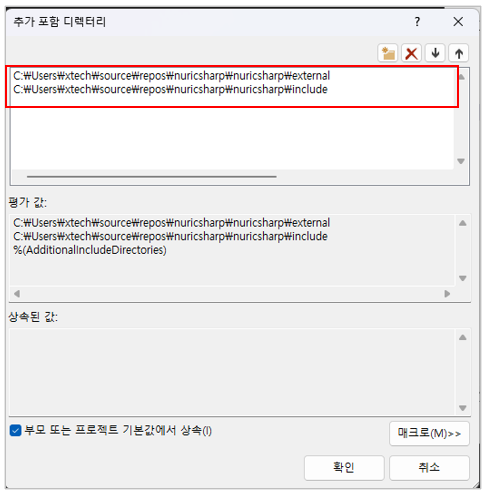
- 구성 속성 -> C/C++ -> 추가 포함 디렉터리 -> 프로젝트 경로\external, 프로젝트 경로\include
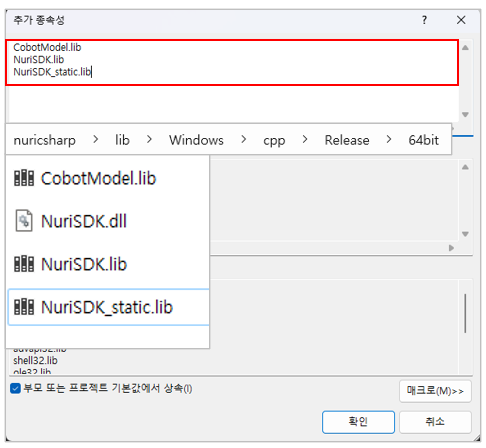
- 구성 속성 -> 링커 -> 입력 -> 추가 종속성 -> 프로젝트 경로\lib\Windows\cpp\Release\64bit 폴더 내 lib 파일들의 이름을 입력
여기까지 설정했다면, 적용 버튼을 눌러 설정을 완료합니다.
함수 작성
사용할 헤더(.h) 파일과 소스(.cpp) 파일을 생성하고, C# 환경에서 사용할 함수를 정의합니다.
C++ 함수를 사용하기 위해선 __declspec(dllexport) 선언이 필요합니다. 여기에선 간단히 하기위해 헤더(.h)파일에 사용자 정의로 'NURI_API' 라는 이름으로 선언하여 사용합니다.
헤더(.h) 파일 내용
#pragma once

#ifdef NURICSHARP_EXPORTS
#define NURI_API        __declspec(dllexport)
#else
#define NURI_API        __declspec(dllimport)
#endif
사용자가 원하는 대로 함수를 생성하거나 만들수 있으며, extern "C" 내부에 내용을 작성해야 외부에서 호출할 수 있습니다.
소스(.cpp) 파일 내용
#include "pch.h"
#include "stdio.h"
#include "nuri.h"
#include <iostream>
#include <thread>
#include <string>
#include "include/nuri/base.h"
#include "include/nuri/model.h"
#include "include/nuri/robot.h"
#include "include/nuri/utility.h"
#pragma warning(disable:4996)

using namespace nuri;
NuriRobot* robot;

std::error_code ec;
std::string id;
extern "C"
{
    /* ===================================================
    @brief 로봇과의 연결을 위한 함수
    @return 성공 : 0 / 실패 : -1
    @param [in]ip       연결할 로봇 IP
    =================================================== */
    NURI_API int connectRobot(const char* ip)
    {
        try
        {
            std::string ipAddress = ip;

            robot = new nuri::NuriRobot(ipAddress);

            return 0;
        }
        catch (const std::exception& e)
        {
            return -1;
        }
    }

    /* ===================================================
    @brief 로봇과의 연결을 해제하기 위한 함수
    @return 성공 : 0 / 실패 : -1
    =================================================== */
    NURI_API int disconnectFromRobot()
    {
        try
        {
            robot->disconnectFromRobot(ec);

            return 0;

        }
        catch (const std::exception& e)
        {
            return -1;
        }
    }

    /* ===================================================
    @brief Move J (joint Motion) 입력
    @return 성공 : 0 / 실패 : -1
    @param [in] array   타겟 위치
           [in] length  배열 크기
           [in] speed   모션 속도
           [in] radius  반지름
    =================================================== */
    NURI_API int addMoveAbsJ(double* array, int length, int speed, int radius)
    {
        try {
            JointPosition jointPos(std::vector<double>(array, array + length));
            MoveAbsJCommand moveAbsJCommand(jointPos, speed, radius);
            robot->moveAppend({ moveAbsJCommand }, id, ec);

            return 0;

        }
        catch (const std::exception& e) {
            return -1;
        }
    }

  /* ===================================================
    @brief 모션 모드 설정
    @param [in]motionControlMode
        Idle = 0,
        NrtCommand = 1,
        NrtRLTask = 2,
        RtCommand = 3
    =================================================== */
    NURI_API int setMotionControlMode(int motionControlMode)
    {
        try
        {
            robot->setMotionControlMode(static_cast<MotionControlMode>(motionControlMode), ec);

            return 0;
        }
        catch (const std::exception& e) {
            return -1;
        }
    }

    /* ===================================================
    @brief 모터 상태 설정
    @return 성공 : 0 / 실패 : -1
    @param [in] on : true 모터 on / false 모터 off
    =================================================== */
    NURI_API int setPowerState(bool on)
    {
        try
        {
            robot->setPowerState(on, ec);

            return 0;
        }
        catch (const std::exception& e) {
            return -1;
        }
    }

    /* ===================================================
    @brief 모션 재생
    @return 성공 : 0 / 실패 : -1
    =================================================== */
    NURI_API int moveStart()
    {
        try
        {
            robot->moveStart(ec);

            return 0;
        }
        catch (const std::exception& e) {
            return -1;
        }
    }

    /* ===================================================
    @brief 모션 정지
    @return 성공 : 0 / 실패 : -1
    =================================================== */
    NURI_API int stop()
    {
        try
        {
            robot->stop(ec);

            return 0;
        }
        catch (const std::exception& e) {
            return -1;
        }
    }

    /* ===================================================
    @brief 모션 초기화
    @return 성공 : 0 / 실패 : -1
    =================================================== */
    NURI_API int moveReset()
    {
        try
        {
            robot->moveReset(ec);

            return 0;
        }
        catch (const std::exception& e) {
            return -1;
        }
    }

    /* ===================================================
    @brief 동작 모드 설정
    @param [in]operateMode
        manual    = 0,      ///< manual
        automatic = 1,      ///< automatic
        unknown   = Unknown ///< Unknown (abnormalities occurred)
    =================================================== */
    NURI_API int setOperateMode(int operateMode)
    {
        try
        {
            robot->setOperateMode(static_cast<OperateMode>(operateMode), ec);

            return 0;
        }
        catch (const std::exception& e) {
            return -1;
        }
    }

    /* ===================================================
    @brief 현재 동작 상태 확인
    =================================================== */
    NURI_API int operationState()
    {
        switch (robot->operationState(ec))
        {
        case OperationState::idle:
            return 0;

        case OperationState::jog:
            return 1;

        case OperationState::rtControlling:
            return 2;

        case OperationState::drag:
            return 3;

        case OperationState::rlProgram:
            return 4;

        case OperationState::demo:
            return 5;

        case OperationState::dynamicIdentify:
            return 6;

        case OperationState::frictionIdentify:
            return 7;

        case OperationState::loadIdentify:
            return 8;

        case OperationState::moving:
            return 9;

        default: // OperationState::unknown:
            return -1;
        }
    }
}
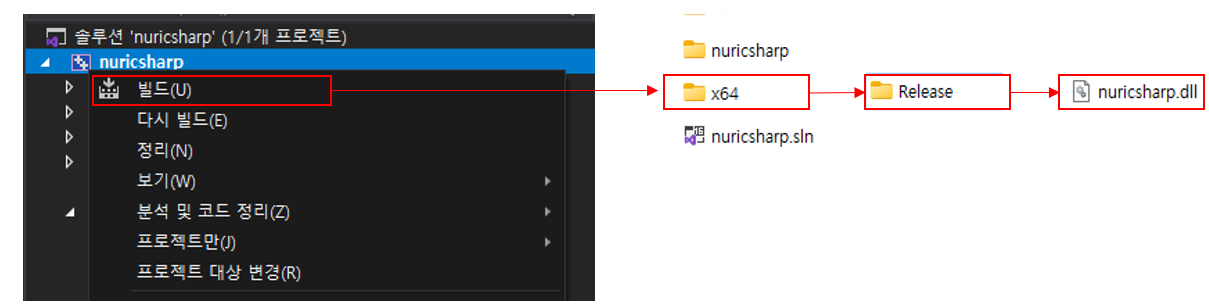
함수 작성이 끝났다면, 솔루션을 빌드하여 프로젝트이름.dll 을 생성합니다.
C#에서 사용하기
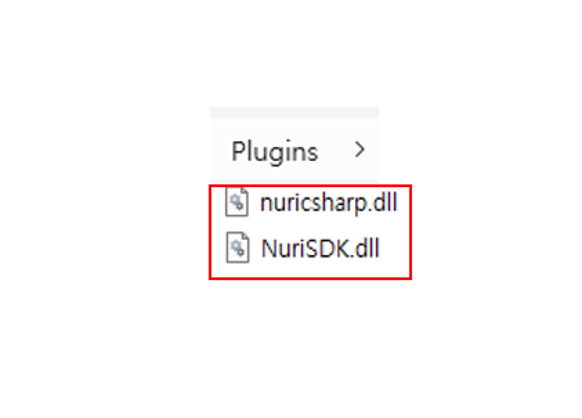
앞선 과정에서, .dll 파일을 생성했다면 이제 그 파일을 사용하고자하는 C# 폴더 내부로 옮깁니다. 생성한 dll 파일은 NuriSDK.dll 파일내의 함수를 호출하도록 만들어진 것이므로 NuriSDK.dll 파일도 C# 폴더 내부로 같이 옮겨줍니다. 본 예제에서는 Unity 를 사용했으므로 Plugins 폴더 아래에 파일을 복사해줍니다.
일반적인 C# 프로젝트를 생성하는 경우, Release 또는 Debug 폴더 내에 dll 파일을 복사해 줍니다.
파일을 옮겼다면, 선언 했던 함수들을 호출하는 코드를 작성합니다. C#에서 DllImport 를 사용하기 위해서는 System.Runtime.InteropServices 를 선언해야합니다.
그 이후, dll 에서 생성했던 함수의 이름을 선언합니다. 함수를 선언할 땐 dll에서 사용했던 함수명 및 리턴 값, 함수에 사용되는 인자의 갯수와 종류를 맞추어 작성해야합니다.
[DllImport("nuricsharp")]
public static extern int connectRobot(string ip);

[DllImport("nuricsharp")]
public static extern int disconnectFromRobot();

[DllImport("nuricsharp")]
public static extern int addMoveAbsJ(IntPtr array, int length, int speed, int radius);

[DllImport("nuricsharp")]
public static extern int setMotionControlMode(int motionControlMode);

[DllImport("nuricsharp")]
public static extern int setPowerState(bool on);
...
아래는 MoveAbsJ 모션 재생을 포함한 사용 예제입니다.
using System;
using System.Collections.Generic;
using System.Runtime.InteropServices;
using System.Threading;
using UnityEngine;

public class nuricsharp
{
    [DllImport("nuricsharp")]
    public static extern int connectRobot(string ip);

    [DllImport("nuricsharp")]
    public static extern int disconnectFromRobot();

    [DllImport("nuricsharp")]
    public static extern int setPowerState(bool on);

    [DllImport("nuricsharp")]
    public static extern int setMotionControlMode(int motionControlMode);

    [DllImport("nuricsharp")]
    public static extern int setOperateMode(int operateMode);

    [DllImport("nuricsharp")]
    public static extern int addMoveAbsJ(IntPtr array, int length, int speed, int radius);

    [DllImport("nuricsharp")]
    public static extern int moveStart();

    [DllImport("nuricsharp")]
    public static extern int stop();

    [DllImport("nuricsharp")]
    public static extern int operationState();
}

public enum OperateMode
{
    manual = 0,
    automatic = 1,
    unknown = -1
}

public enum MotionControlMode
{
    Idle = 0,
    NrtCommand = 1,
    NrtRLTask = 2,
    RtCommand = 3
}

public class NuriSDKTest : MonoBehaviour
{
    // Start is called before the first frame update
    void Start()
    {

    }

    // Update is called once per frame
    void Update()
    {

    }

    public void OnClick()
    {
        string ip = "192.168.20.3";
        int res;

        // 로봇 연결
        res = nuricsharp.connectRobot(ip);

        // 연결 실패시 더이상 진행하지 않음
        if (!res.Equals(0))
        {
            Debug.Log("failed");
            return;
        }

        // 모션 재생을 위해 NrtCommand 모드로 설정
        nuricsharp.setMotionControlMode((int)MotionControlMode.NrtCommand);

        // 모터를 켜기 위해서는 동작 모드가 자동 이여야 한다.
        nuricsharp.setOperateMode((int)OperateMode.automatic);

        // 모터 ON
        nuricsharp.setPowerState(true);

        // 모션 설정
        // 모든 길이는 m, 각도는 radian 기준임.
        List<double> target = new List<double>() { -0.3452, -0.0213, -1.74533, 0.0159, -1.570, 0 };
        double[] array = target.ToArray();
        GCHandle gch = GCHandle.Alloc(array, GCHandleType.Pinned);

        try
        {
            IntPtr pointer = gch.AddrOfPinnedObject();
            res = nuricsharp.addMoveAbsJ(pointer, array.Length, 500, 0);
        }
        finally
        {
            gch.Free();
        }

        // 모션 재생
        res = nuricsharp.moveStart();
        if (!res.Equals(0))
        {
            Debug.Log("failed : " + res);
            return;
        }

        // 모션이 끝날때까지 기다림
        waitRobot();

        // 모션 완료 후
        // 모터 OFF
        nuricsharp.setPowerState(false);

        // 동작 모드 수동 모드로 설정
        nuricsharp.setOperateMode((int)OperateMode.manual);


        // 로봇 연결 해제
        nuricsharp.disconnectFromRobot();
    }

    // 모션이 진행중인지 확인
    public void waitRobot()
    {
        Thread.Sleep(2000);
        bool running = true;
        while(running)
        {
            int res = nuricsharp.operationState();
            if(res.Equals(0) || res.Equals(-1))
            {
                running = false;
            }
        }
    }
}
NURI SDK 에 대한 자세한 설명은 SDK 매뉴얼을 참고하시기 바랍니다.
Sdk매뉴얼
PDF 형태의 사용자 매뉴얼은 SDK 구매 시 제공되며, 매뉴얼을 제공받지 못하거나 분실한 고객은 메일(sales@neuromeka.com)을 통해 요청해주시기 바랍니다.
