튜토리얼
PD 제어기 빌드 예시
이 튜토리얼은 사용자가 IndySDK 개발 환경에서 사용자 정의 컨트롤러 컴포넌트를 직접 구현하고 빌드하여 실행할 수 있도록 단계별 가이드를 제공합니다. IndySDK를 이용한 컴포넌트 빌드는 CMake을 이용하도록 되어 있습니다. 본 튜토리얼에서는 편의 상 CMake 이용이 용이한 Jetbrains의 CLion IDE를 이용한 튜토리얼을 예시로 설명합니다.
그리고 제어기 구현 예제로서 관절공간 PD Set-point regulation 제어기 구현에 대해 설명합니다. 이는 로보틱스에서 다자유도 로봇 매니퓰레이터의 수동성 (Passivity)과 점근적 안정성 (asymptotic stability)을 보장하는 것으로 잘 알려진 예제입니다.
컴포넌트 생성 및 CMake 로드
제공된 Git 저장소의 프로젝트를 클론 후 프로젝트 경로의 src_cpp/PluginComponents 폴더 내에 새 디렉토리를 추가하여 새로운 플러그인 컴포넌트를 만듭니다.
새 플러그인 컴포넌트 폴더를 만드는 단계:
src_cpp/PluginComponents폴더 하위에 새 폴더 (CustomPdJointController)를 만듭니다.
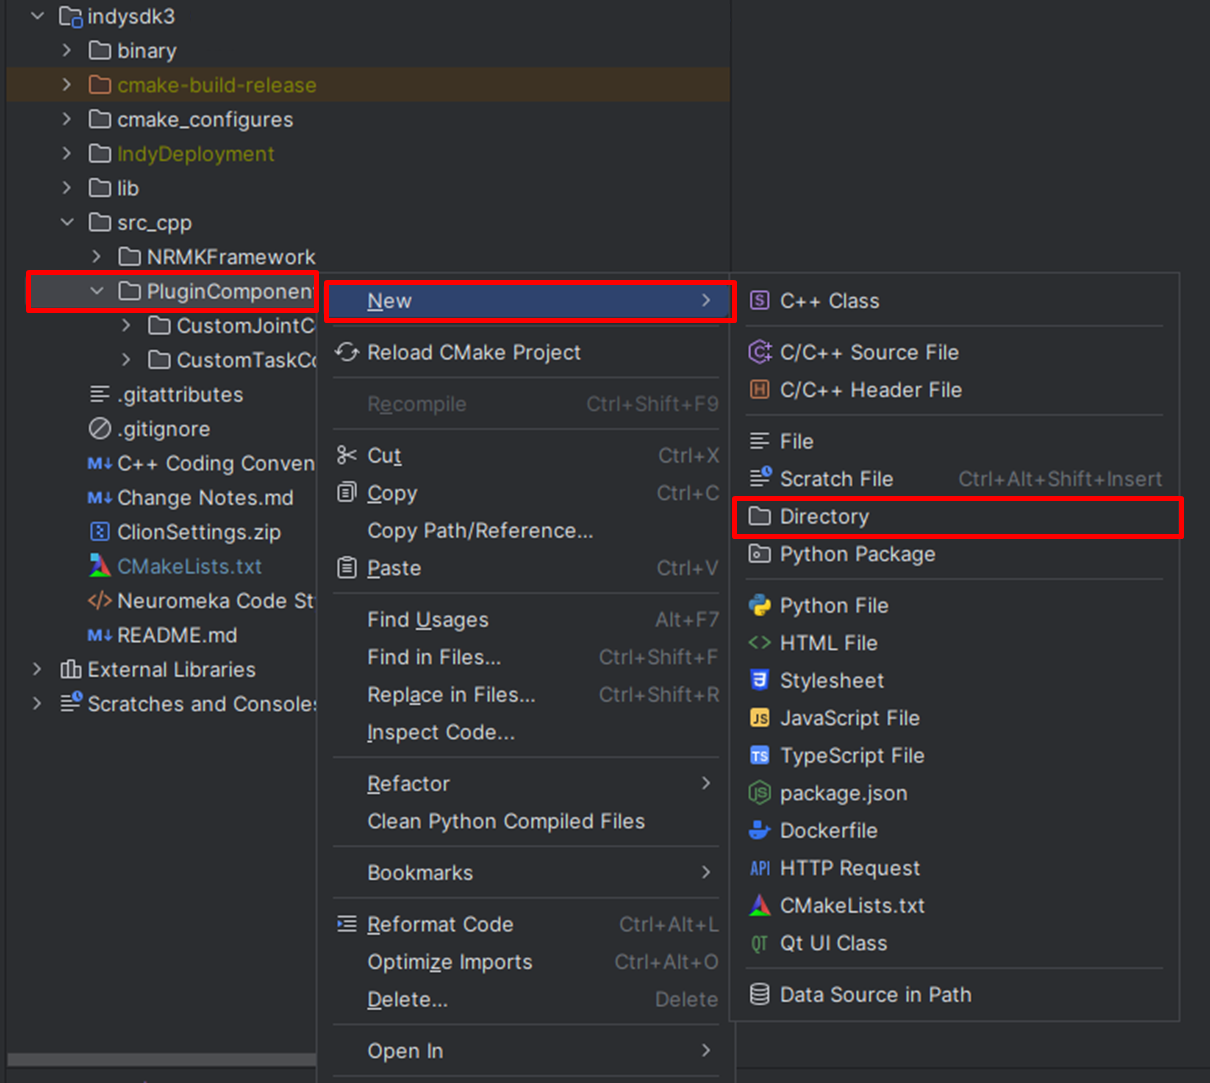
Creating a New Plugin Component Folder
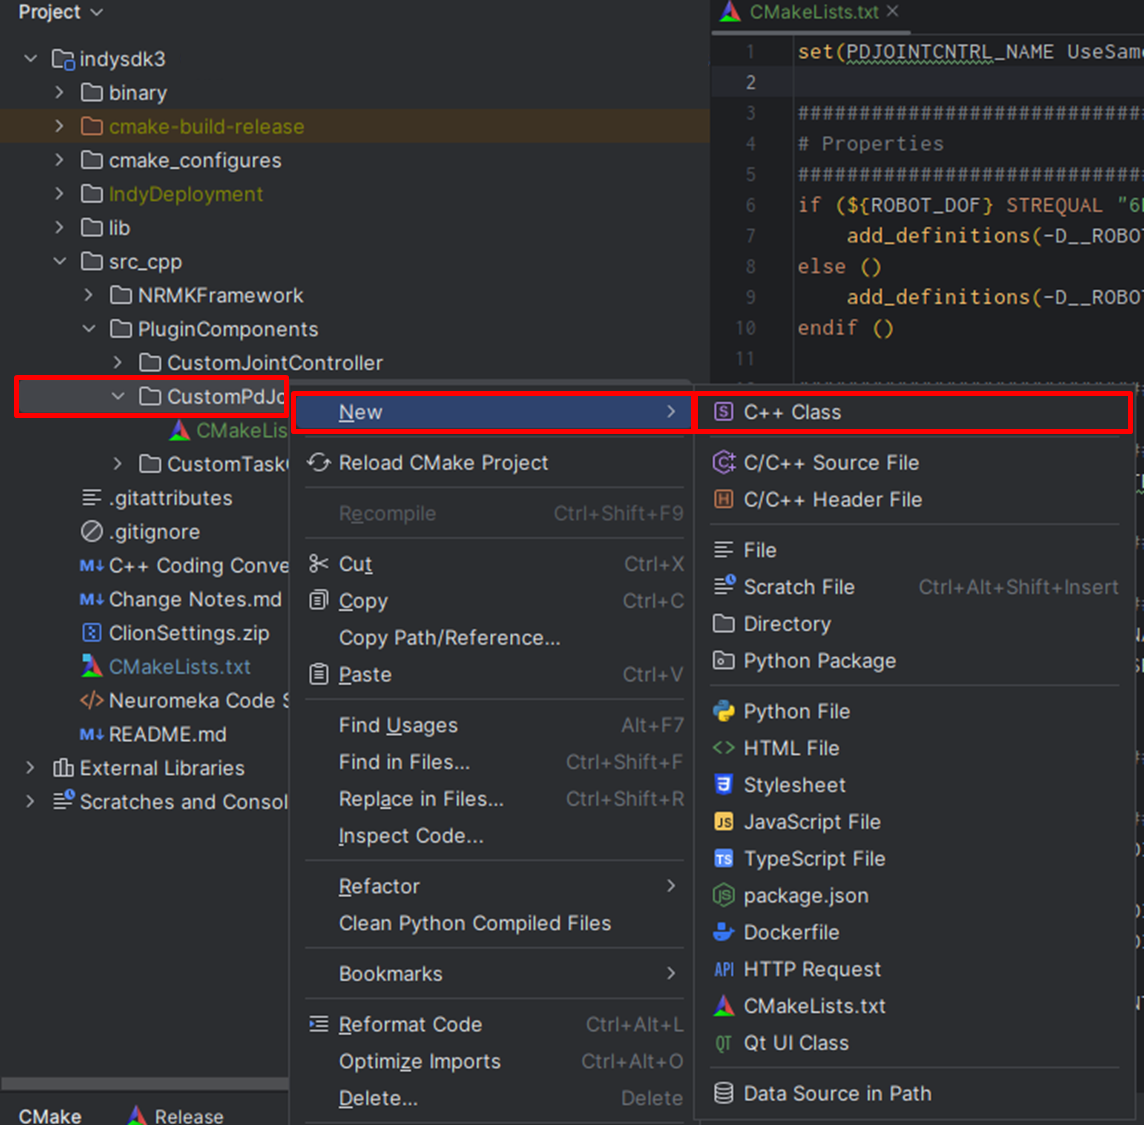
src_cpp/PluginComponents/CustomPdJointController에 C++ 클래스 파일(CustomPdJointController.h, CustomPdJointController.cpp)을 생성합니다.
src_cpp/PluginComponents/CustomPdJointController에CMakeList.txt파일을 생성합니다.
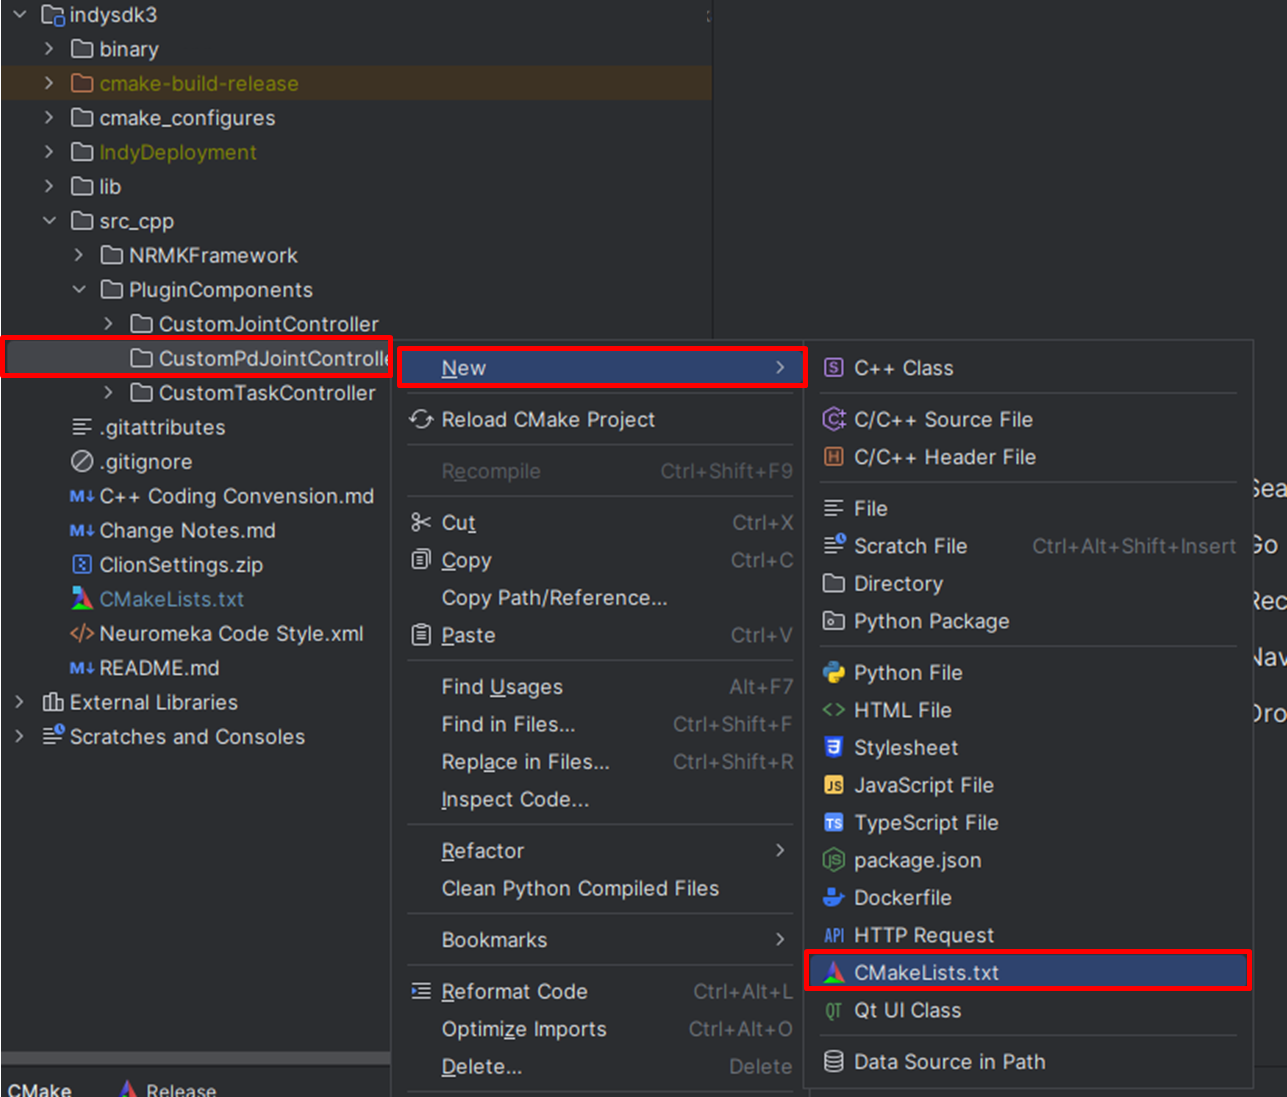
Adding CMakeLists File
- 생성된
CMakeLists.txt파일의 코드를 아래와 같이 작성합니다.
set(PDJCTRLCOMP_NAME CustomPdJointControllerCreator)

#############################################################
# Properties                                                #
#############################################################

#############################################################
# Sources                                                   #
#############################################################
file(GLOB_RECURSE PDJCTRLCOMP_SRC "*.cpp")

#############################################################
# Shared Library (Plugin)                                   #
#############################################################
add_library(${PDJCTRLCOMP_NAME} MODULE
            ${PDJCTRLCOMP_SRC}
)

#############################################################
# Libraries linking                                         #
#############################################################
target_link_libraries(${PDJCTRLCOMP_NAME} ${LIBS})

set_target_properties(${PDJCTRLCOMP_NAME} PROPERTIES SUFFIX ".comp")
set_target_properties(${PDJCTRLCOMP_NAME} PROPERTIES PREFIX "")

install (TARGETS ${PDJCTRLCOMP_NAME} DESTINATION ./PluginComponents)
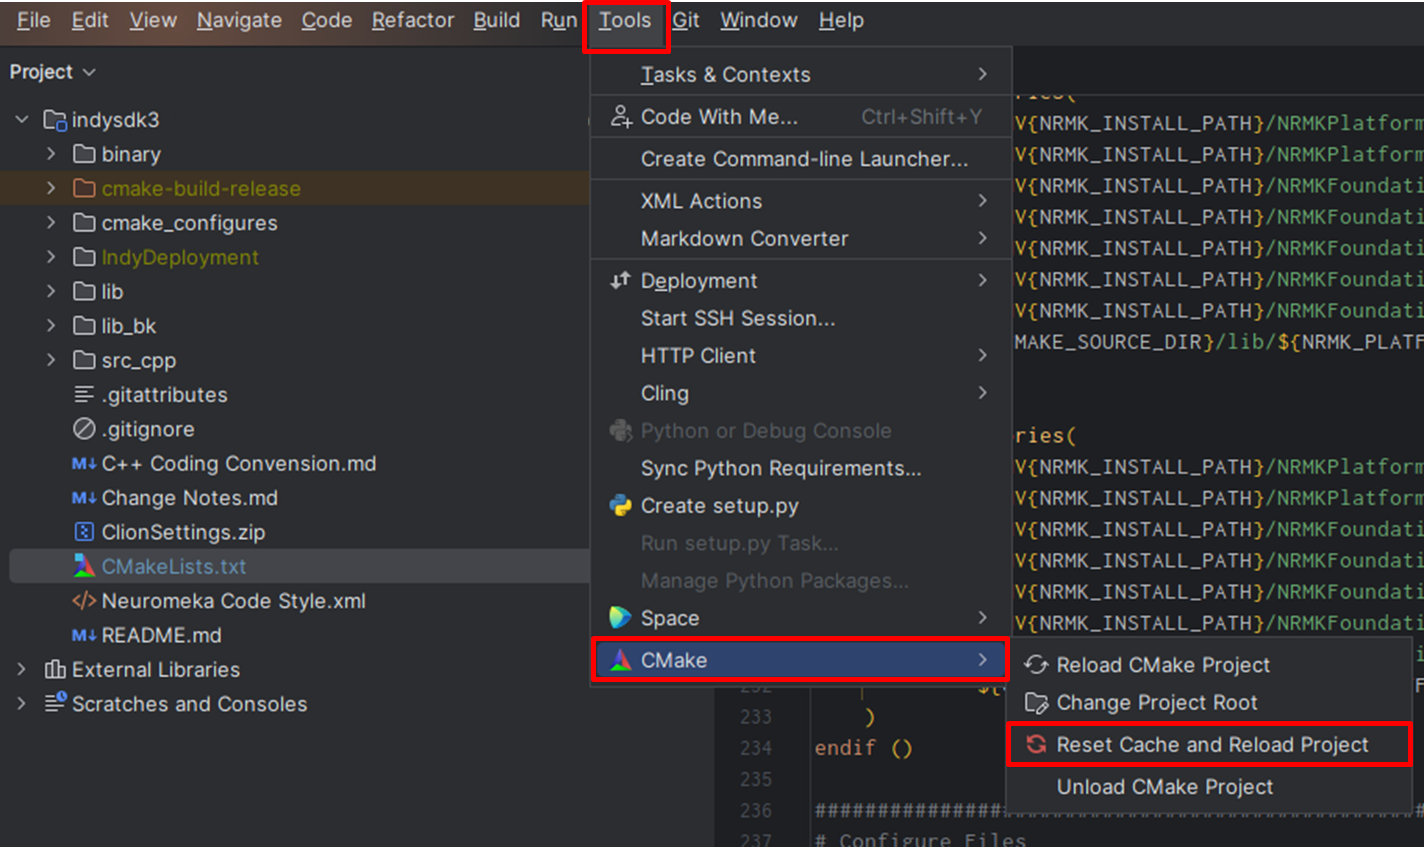
Tools>CMake>Reset Cache and Reload Project를 통해 CMake를 로드합니다.
컴포넌트 템플릿
관절공간 PD 제어기의 컴포넌트 빌드를 위한 헤더 파일과 소스 파일 템플릿을 작성합니다.
Header file template
#pragma once

/**< Necessary includes */
#include <NRMKFramework/AbstractComponent/ControlAlgorithm.h>
#include <NRMKFramework/GlobalDefinitions.h>
#include <Controller/PositionController.h>

#include <Poco/ClassLibrary.h>
#include <Poco/ClassLoader.h>
#include <Poco/MetaObject.h>

template<typename ROBOT>
class CustomPdJointController : public NRMKControl::ControlAlgorithm<ROBOT>
{
    // Type definitions for clarity and ease of maintenance
    typedef NRMKControl::ControlAlgorithm<ROBOT> AlgorithmBase;
    typedef typename AlgorithmBase::ControlGains ControlGains;
    typedef typename NRMKControl::ControlAlgorithm<ROBOT>::MotionData MotionData;
    typedef typename NRMKControl::ControlAlgorithm<ROBOT>::ControlData ControlData;
    typedef typename ROBOT::JointVec JointVec;
    typedef typename ROBOT::JointMat JointMat;

public:
    /**< Constructor and member functions */
    CustomPdJointController() = default;
    virtual void initialize(ROBOT& robot, double delt) override;
    virtual void reset(ROBOT& robot) override;
    virtual void compute(ROBOT& robot, const LieGroup::Vector3D& gravityDir,
                         const MotionData& motionData, ControlData& controlData) override;

private:
    JointVec _kp = this->gain0;
    JointVec _kv = this->gain1;
};

/**< Class creator to facilitate dynamic loading if necessary */
class CustomPdJointControllerCreator : public NRMKControl::ControlAlgorithmCreator
{
    CONTROL_CREATOR_BODY(CustomPdJointController)
};
Source file template
소스 파일에는 헤더 파일에 선언된 함수의 정의가 포함되어 있습니다. 여기에서 사용자는 각자의 제어기를 구현하도록 합니다.
#include "CustomPdJointController.h"

template<typename ROBOT>
void CustomPdJointController<ROBOT>::initialize(ROBOT &robot, double delt)
{
    /**< Initialization logic for the controller */
}

template<typename ROBOT>
void CustomPdJointController<ROBOT>::reset(ROBOT &robot)
{
    /**< Reset logic for the controller */
}

template<typename ROBOT>
void CustomPdJointController<ROBOT>::compute(ROBOT &robot, const LieGroup::Vector3D &gravDir,
                                             const MotionData &motionData, ControlData &controlData)
{
    /**< Retrieve the updated gains by gRPC protocols */
    _kp = this->gain0;
    _kv = this->gain1;

    /**< Compute gravitational torque based on the robot's current configuration and gravity direction */
    robot.idyn_gravity(gravDir);
    JointVec tauGrav = robot.tau();

    /**< Calculate the PD control torque */
    JointVec tauPD = _kp.cwiseProduct(motionData.motionPoint.qd - robot.q()) - _kv.cwiseProduct(robot.qdot());

    /**< Combine PD and gravitational torques for the final control command */
    controlData.controlTorque.tau = tauPD + tauGrav;
}

/**< Manifest to allow dynamic loading of the control algorithm */
POCO_BEGIN_MANIFEST(NRMKControl::ControlAlgorithmCreator)
POCO_EXPORT_CLASS(CustomPdJointControllerCreator)
POCO_END_MANIFEST
참고
위 템플릿의 클래스 이름 CustomPdJointController과 Creator CustomPdJointControllerCreator는 예시로서 사용자 개발 컴포넌트 구현 시 클래스 이름 및 Creator 명명 및 사용을 일관성 있게 작성하시기 바랍니다.
Creator 선언 및 정의
위 템플릿의 클래스 이름 CustomPdJointController과 Creator CustomPdJointControllerCreator는 예시로서 사용자 개발 컴포넌트 구현 시 클래스 이름 및 Creator 명명 및 사용을 일관성 있게 작성하시기 바랍니다. Creator 클래스의 경우 헤더파일에서는 POCO Manifest 선언이 되어야 하며, cpp파일에서는 아래와 같이 정의가 되어야 합니다.
header file
// Class creator to facilitate dynamic loading if necessary
class MyCustomJointControllerCreator : public NRMKControl::ControlAlgorithmCreator
{
    CONTROL_CREATOR_BODY(MyCustomJointController)
};
cpp file
POCO_BEGIN_MANIFEST(NRMKControl::ControlAlgorithmCreator)
POCO_EXPORT_CLASS(MyCustomJointControllerCreator)
POCO_END_MANIFEST
PD+중력보상 제어기 구현하기
이제 주어진 템플릿을 기반으로 관절공간 PD (비례-미분) 제어기와 피드포워드 중력보상 제어 알고리즘의 구현을 구현할 수 있습니다.
아래는 compute 함수의 구현입니다. 해당 제어기 실행 시 gain값은 0으로 초기화되어 있습니다. 게인 튜닝을 통해 게인 값 설정 후 사용하시기 바랍니다.
template<typename ROBOT>
void CustomPdJointController<ROBOT>::compute(ROBOT &robot, const LieGroup::Vector3D &gravDir,
                                             const MotionData &motionData, ControlData &controlData)
{
    /**< Retrieve the updated gains by gRPC protocols */
    _kp = this->gain0;
    _kv = this->gain1;

    /**< Compute gravitational torque based on the robot's current configuration and gravity direction */
    robot.idyn_gravity(gravDir);
    JointVec tauGrav = robot.tau();

    /**< Calculate the PD control torque */
    JointVec tauPD = _kp.cwiseProduct(motionData.motionPoint.qd - robot.q()) - _kv.cwiseProduct(robot.qdot());

    /**< Combine PD and gravitational torques for the final control command */
    controlData.controlTorque.tau = tauPD + tauGrav;
}
- PD제어 이득 설정: 비례 (kp) 및 미분 (kd) 이득 행렬을 초기화합니다. 각 조인트에 대해 개별적인 비례 및 미분 이득을 구성합니다. 지정된 이득은 설명을 위한 것이며, 사용자는 최적의 성능을 위해 PD 이득을 적절히 조정할 것으로 예상됩니다.
- 중력토크: 로봇의 메소드
idyn_gravity는 중력 토크를 계산합니다.
컴포넌트 빌드 및 실행
새로 생성된 플러그인 구성 요소 디렉토리, 이 경우 CustomPdJointController가 인식되고 컴파일되도록 하려면, 프로젝트의 CMakeLists.txt 파일에 포함되어야 합니다.
이를 위해 ../src_cpp/CMakeLists.txt 파일을 아래와 같이 작성합니다.
#############################################################
# Build & Install
#############################################################
# Tasks
add_subdirectory(src_cpp/PluginComponents/CustomJointController)
add_subdirectory(src_cpp/PluginComponents/CustomTaskController)
add_subdirectory(src_cpp/PluginComponents/CustomPdJointController)
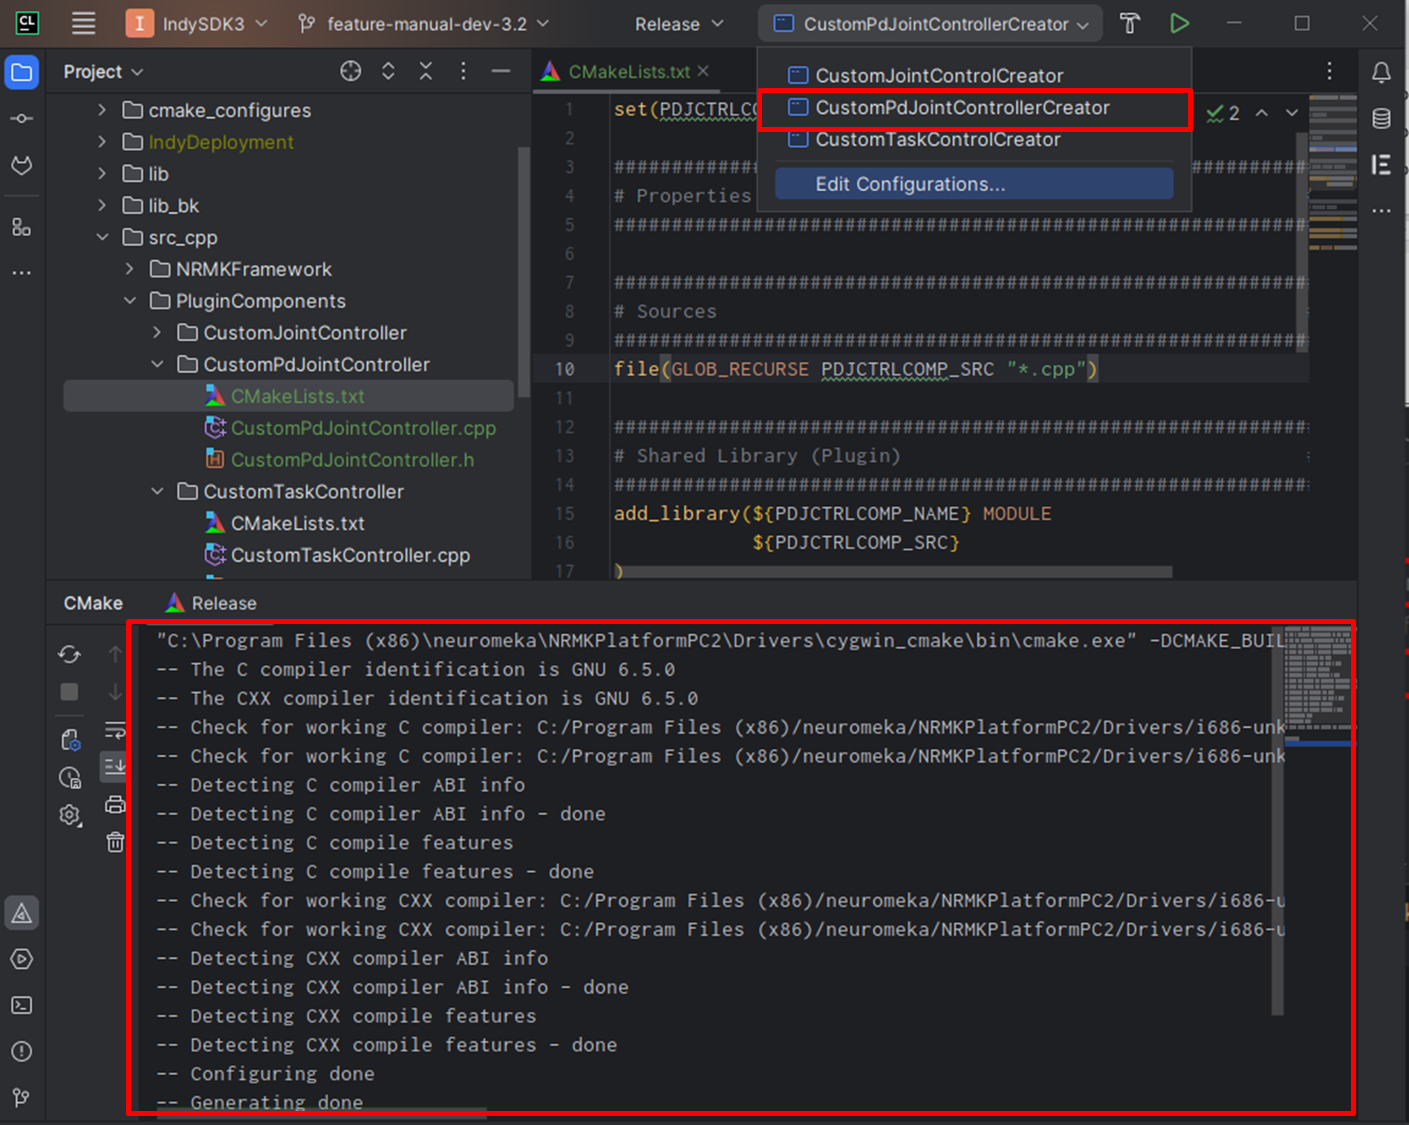
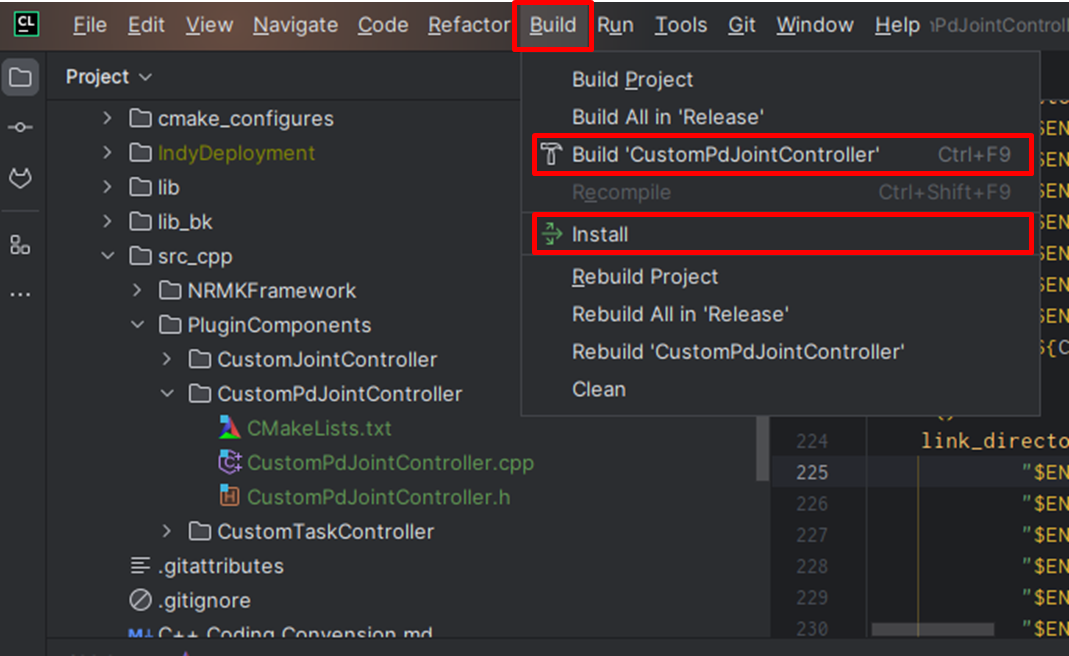
Tools>CMake>Reset Cache and Reload Project를 통해 CMake를 로드 합니다.Build메뉴를 통해 프로젝트 컴포넌트를 빌드합니다.
- 빌드 메뉴의
Install을 통해 컴포넌트 설치파일을 생성합니다. 이는CMakeLists.txt에서 설정된 대로 지정된 출력 디렉토리(../IndyDeployment/PluginComponents/)에 설치되도록 합니다.
Install이 완료되면 필요한 파일을 런타임 사용을 위한 올바른 위치../IndyDeployment/PluginComponents/로 복사됩니다.
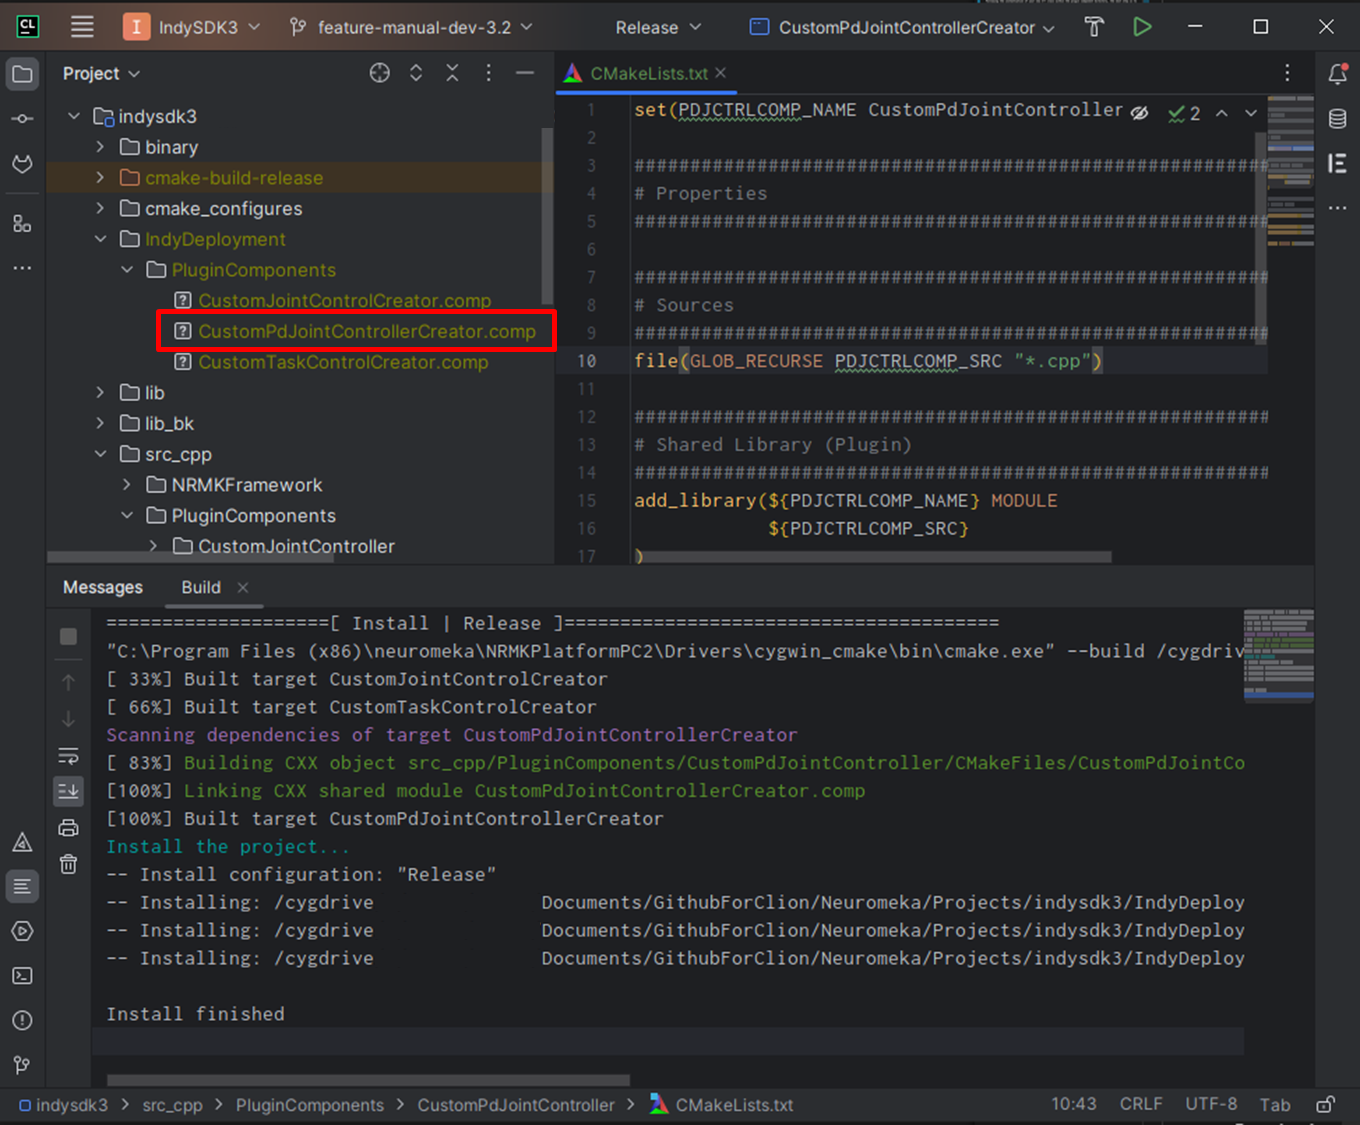
- 최종적으로 생성된 컴포넌트 파일
CustomPdJointControllerCreator.comp을 STEP의 경로/home/user/release/IndyDeployment/PluginComponents/에 배치하여 로봇을 실행하면 사용자가 빌드한 컴포넌트 제어기를 사용할 수 있게 됩니다.
