Control Moby with moby-ros2 package
How to run
1. Open terminal
2. Check ROS2 environment settings
-
In order for ROS2 packages to run, the required workspace must be loaded. You can use the command below to load the ros2_ws workspace where the moby-ros2 package was built in the Installation chapter.
-
However, since the command above was added to the .bashrc file in the Installation chapter, the workspace will now be loaded automatically whenever you open a terminal.
3. Run Moby control node
-
To control Moby in ROS2, you need to run a control node that communicates with the Moby SW Framework. Additionally, for SLAM and navigation, you also need nodes to publish data from the mounted LiDAR and RGBD sensors as ROS2 topics.
-
The moby_bringup.launch.py file runs all the necessary nodes at once.
-
Now, the RViz screen with the Moby model is displayed, and you can control the movement using a joystick.
- You can find the instructions on how to control using a joystick in Basic Operation.
-
You can visualize LiDAR, RGBD, and proximity sensor data by checking the boxes on the left side of the LaserScan, RealSense, and Proximity list in the RViz screen.
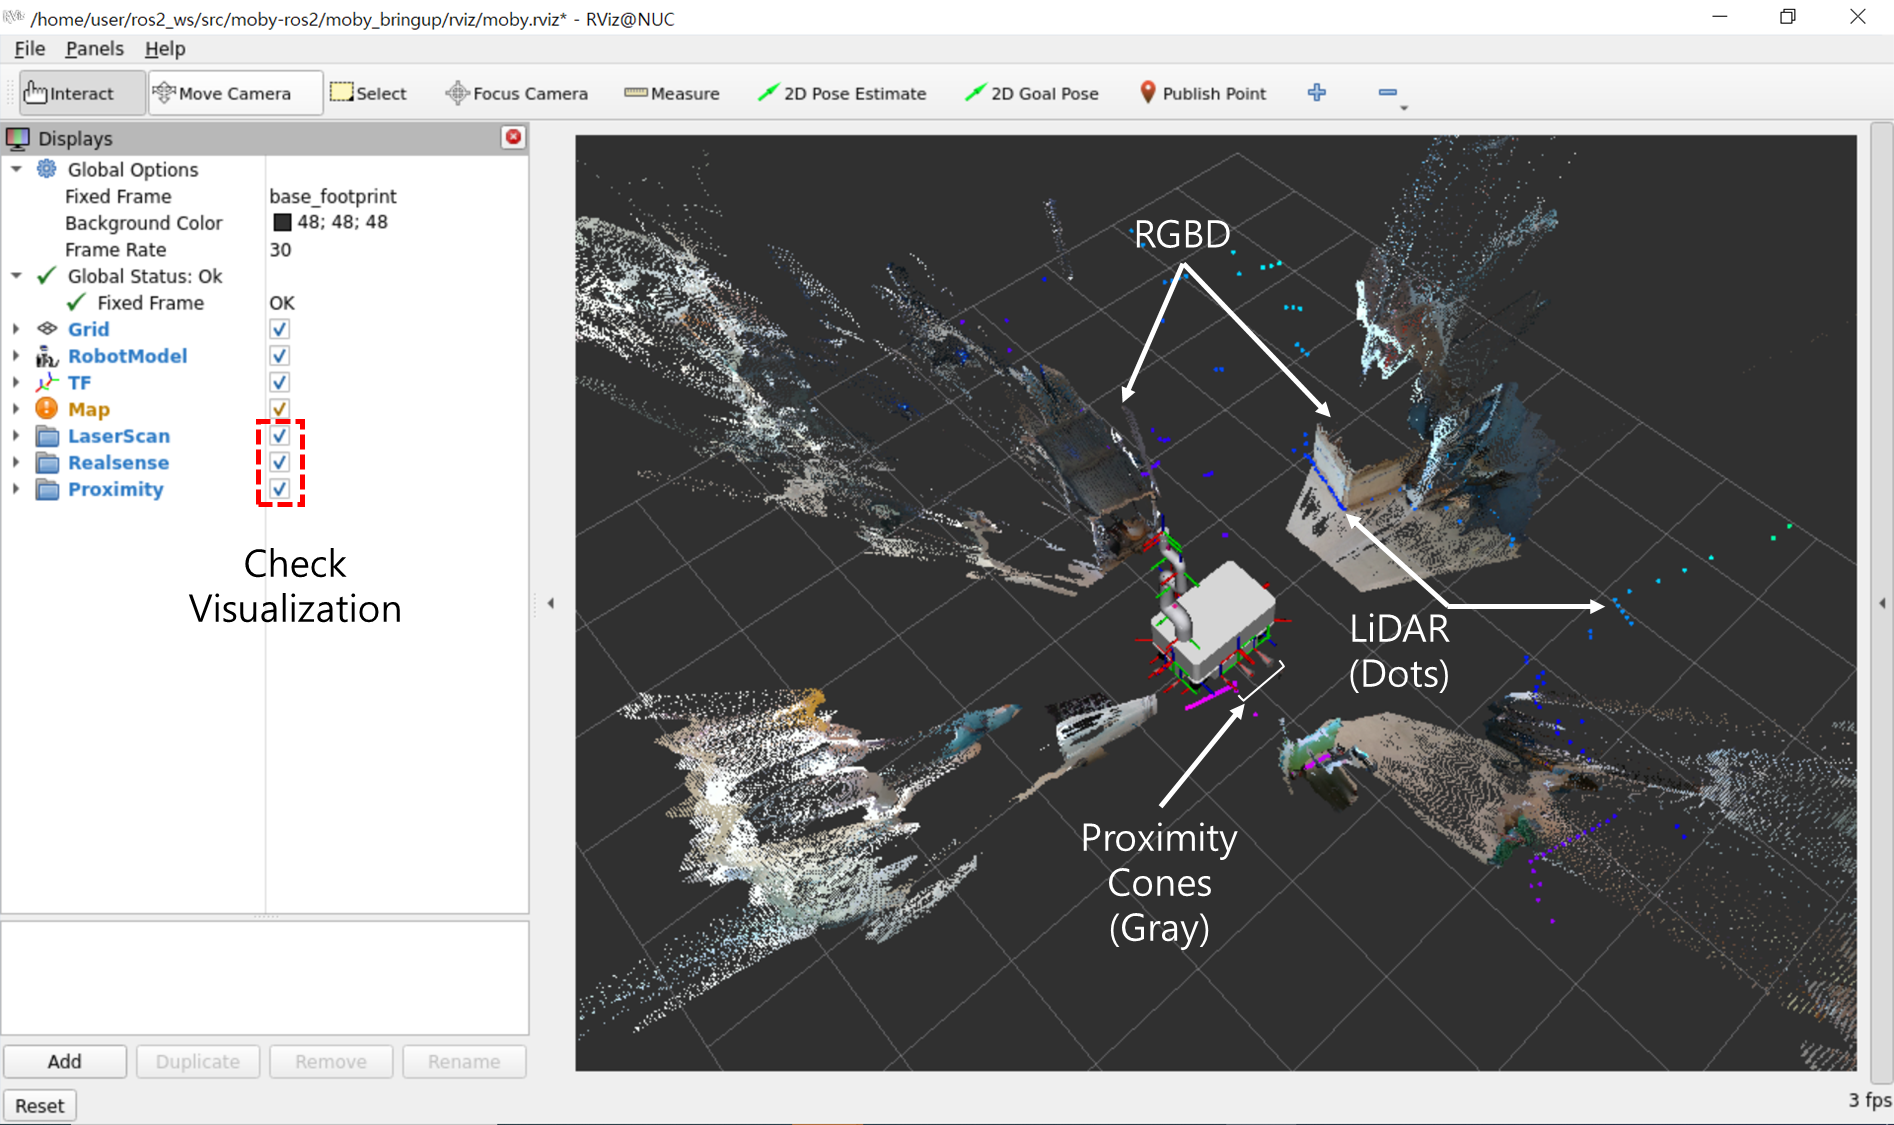
Sensors that can be visualized through the RViz screen
Automatic startup registration
The moby_bringup.launch.py file is a file that always needs to be run to control Moby in ROS2. You can register it to run automatically in the background whenever the power is turned on without having to run it every time, using systemd file registration.
-
Create a moby_bringup.service file in the systemd path using the nano editor.
-
Enter the following execution rules.
[Unit] Description=Bringup Moby by Neuromeka Wants=network.target After=syslog.target network-online.target [Service] User=user Type=simple ExecStart=/bin/bash -c 'source /home/user/ros2_ws/install/setup.bash; ros2 launch moby_bringup moby_bringup.launch.py' WorkingDirectory=/home/user KillMode=process [Install] WantedBy=multi-user.target -
The command entered in the ExecStart item will be executed at boot time. In the example above, a command to load the workspace and run the moby_bringup.launch.py file is entered.
-
Press Ctrl+X, Y, Enter in sequence to save.
-
To apply the added file and run the moby_bringup service in the background, execute the following command.
-
The status of the moby_bringup service running in the background can be checked with the following command.
-
To stop the moby_bringup service running in the background, enter the following command.
-
You can check the real-time terminal output of the background service with the command below. To view all past records, simply run the command without the -f option.
Configuration of moby_bringup.launch.py file
- When moby_bringup.launch.py is executed, configuration information related to Moby-RP is loaded from the following path:
- The file configuration is as follows:
| Name | Type | Description |
|---|---|---|
| moby_type | string | The type of Moby to be controlled. Currently, moby_rp is supported. |
| step_ip | string | The internal IP address of STEP3, which controls Moby. In Moby-RP, it is set to 192.168.214.20 by default. |
| use_gyro | bool | Determines whether to use the orientation information of the built-in gyro sensor for Moby's odometry calculation. |
| lidar_ip | dict | The IP address of the LiDAR sensor. In Moby-RP, the default setting is to use two LiDARs (front/rear), with each set to 192.168.214.10 and 192.168.214.11, respectively. |
| realsense_serial | dict | The serial number of the mounted RGBD sensor. There are four installed on Moby-RP (front/rear/left/right), and they are shipped with the corresponding serial number entered for each sensor. |
- When running moby_bringup.launch.py, you can specify the following options on the command line, depending on the situation:
| Name | Type | Description | Default Value |
|---|---|---|---|
| name | string | Robot name | moby |
| prefix | string | Prefix for distinguishing each robot when using multiple robots | None |
| launch_rviz | bool | Whether to run the RViz screen | false |
| use_joypad | bool | Whether to run the joypad control | true |
The main nodes executed in the moby_bringup.launch.py file and the main topics and features that each node publishes or subscribes to are as follows:
| Name | Publishes | Subscribes | Function |
|---|---|---|---|
| front_lidar | /front_lidar/scan | Publishes front LiDAR data | |
| rear_lidar | /rear_lidar/scan | Publishes rear LiDAR data | |
| laserscan_multi_merger | /scan | /front_lidar/scan, /rear_lidar/scan | Merges front/rear LiDAR data into a single topic |
| front_camera | /front_camera/ depth/color/points | Publishes point cloud data of the front RGBD sensor | |
| rear_camera | /rear_camera/ depth/color/points | Publishes point cloud data of the rear RGBD sensor | |
| left_camera | /left_camera/ depth/color/points | Publishes point cloud data of the left RGBD sensor | |
| right_camera | /right_camera/ depth/color/points | Publishes point cloud data of the right RGBD sensor | |
| robot_state_publisher | /tf | /joint_states | Receives /joint_states and publishes kinematic results on /tf |
| moby_grpc | /imu, /odom_encoders | /cmd_vel | Drives Moby according to cmd_vel commands and publishes gyro sensor data and odometry results |
| ekf_filter_node | /odom | /imu, /odom_encoders | Applies EKF filter to gyro sensor data and odometry information to publish improved odometry |
| rviz2 | Provides a graphical interface of the current situation through the RViz screen | ||
| joy_linux | /joy | Publishes joystick information to the /joy topic | |
| console_controller | /cmd_vel | /joy | Publishes velocity commands according to the /joy topic |
