Installation and Configuration
The NURI SDK provided is a library based on C++.
Sdk
PDF version of the user manual is provided at the time of robot purchase. Customers who did not receive a manual or have lost it can request one via the email below. sales@neuromeka.com
Installation
- Provide separately to NURI SDK licensees
Build Environment
Commone (Linux/Windows)
- CMake 3.12 or later versions
Windows
-
Microsoft Visual Studio 2017 or later
-
Select and install "Desktop development with C++"
Execution
Users can build and run directly through the NURI SDK.This chapter guides you through how to set up a pre-installed NURI SDK project.
Setting Up a Network Environment
The NURI SDK is connected to the robot via Ethernet (TCP/IP). The user PC and the robot are connected to the same LAN using a wired or wireless connection. A wireless connection can be used for non-real-time control that does not require high network performance.
For real-time control, a wired connection to the robot is recommended. The robot has two network interfaces, including one external network interface and one direct connect network interface. The default static IP of the direct connect network interface is 192.168.0.160.
-
Wired connection : Direct cable connection between the robot and the user PC. The IP address of the user's PC (Personal Computer) and the static IP address of the robot should be in the same network segment, e.g. 192.168.0.22.
-
Wireless connection : The robot's external network interface is connected to the router or switch, and the user PC is also connected to the router or switch with both of them in the same LAN.
Note
Wired connection is recommended for connection, as Wireless connection may cause unstable robot motion in case of poor network communication.
Modify the example functions
And after opening the 'sdk_example_custom.cpp' file in the path below, set the robot IP you want to connect to within the main function.
sdk_example_custom.cpp
int main() {
NuriRobot robot;
  try {
    robot.connectToRobot("The Robot IP you want to connect to"); // robot connection
  } catch (const nuri::Exception &e) {
    std::cerr << e.what();
    return -1;
  }

  example_basicOperation(&robot);
  moveJMotion(robot);
}
the functions declared in sdk_example_custom.cpp:
Basic information from the robot's internals:
void example_basicOperation(Robot_T<wt, dof> *robot){
  error_code ec;
  // *** Info query ***
  auto robotinfo = robot->robotInfo(ec);
  std::cout << "Nuri controller version: " << robotinfo.version << std::endl;
  std::cout << "Nuri-SDK version: " << robot->sdkVersion() << std::endl;

  // *** Get current robot's posture, joint angles and base frame ***
  auto joint_pos = robot->jointPos(ec); // joint angels [rad]
  auto joint_vel = robot->jointVel(ec); // joint velocity [rad/s]
  auto joint_torque = robot->jointTorque(ec); // joint torque [Nm]
  auto tcp_xyzabc = robot->posture(CoordinateType::endInRef, ec);
  auto flan_cart = robot->cartPosture(CoordinateType::flangeInBase, ec);
  robot->baseFrame(ec); // base frame
  std::cout << "The coordinate of robot end w.r.t. reference frame\n" << tcp_xyzabc << std::endl;
  std::cout << "The coordinate of flange w.r.t. base frame\n" << flan_cart << std::endl;

  // Get controller log
  auto logs = robot->queryControllerLog(5, {LogInfo::Level::error}, ec);
  std::cout << "Controller Logs - " << std::endl;
  for(const auto &log : logs) {
    std::cout << "ID: " << log.id << " Content: " << log.content << std::endl;
  }
}
Play back (execute) the robot's motion (MoveJ):
void moveJMotion(NuriRobot& robot) {
    error_code ec;
    std::string id;

    // switch to auto mode and power-on
    robot.setOperateMode(nuri::OperateMode::automatic, ec);
    robot.setPowerState(true, ec);

    // we use default tool and wobj frame here
    Toolset defaultToolset;
    robot.setToolset(defaultToolset, ec);

    MoveAbsJCommand moveJ({ -0.3452, -0.0213, -1.74533, 0.0159, -1.570, 0 }), moveJ2({ 0, 0, 0, 0, 0, 0 });
    robot.moveAppend({ moveJ, moveJ2 }, id, ec);
    robot.moveStart(ec);
    waitForFinish(robot, id, 0);

    robot.setPowerState(false, ec);
}
Build the project
If you have configured the robot's IP address, select 'Release' or 'Debug' in the configuration manager, and run the example to verify that the connection with the robot is functioning correctly.
Linux
Take compilation of the sample program sdk_example as an example. The installation directory is "out" under the root directory:
xCoreSDK-nuri
mkdir build && cd build
cmake .. -DCMAKE_INSTALL_PREFIX=../out
cmake --build . --target sdk_example
cmake --build . --target install
Windows
In order to build the NURI SDK, CMakeLists.txt must be set as the start item. Open a CMake project, Select CMakeLists.txt in the root directory.
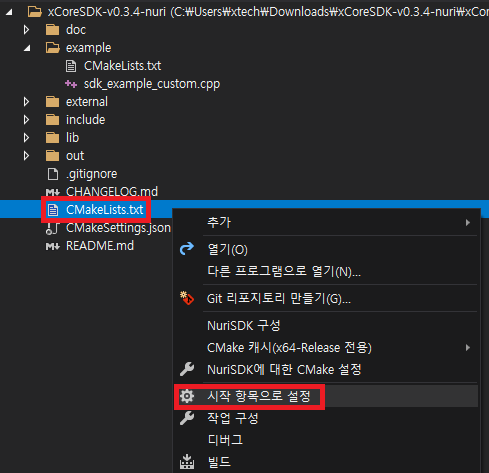
Select CMakeLists.txt in the root directory
For detailed information on the NURI SDK, please refer to the SDK manual.
Sdk
PDF version of the user manual is provided at the time of robot purchase. Customers who did not receive a manual or have lost it can request one via the email below. sales@neuromeka.com
