C# Application Example
Use the NURI SDK to provide a step-by-step guide for users who want to use it in a different language environment.
Create and organize projects
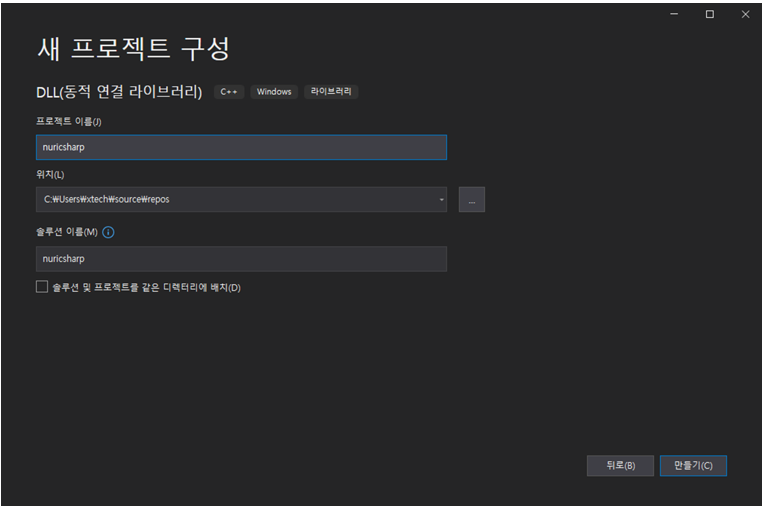
To use a C++ library in C#, you need to create a project as a dynamic-link library (DLL). The project name should match the name of the library you'll be using later.
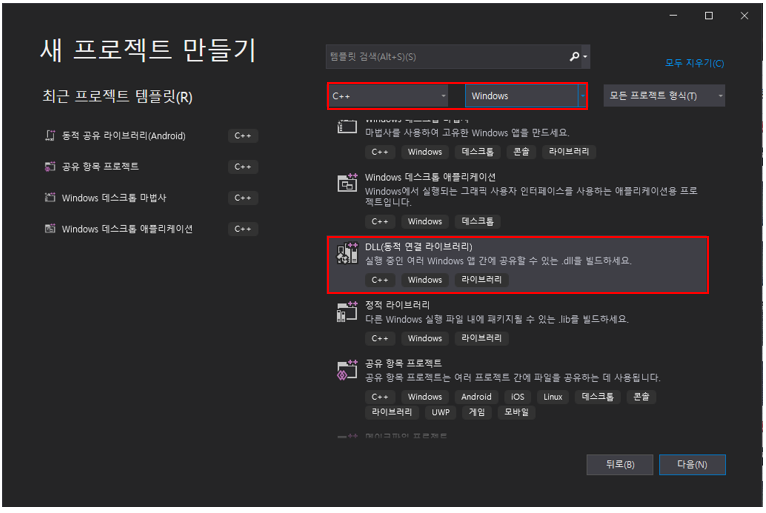
In the "Create a new project" window, navigate to C++/Windows -> DLL (Dynamic-Link Library) and select it to create the project.
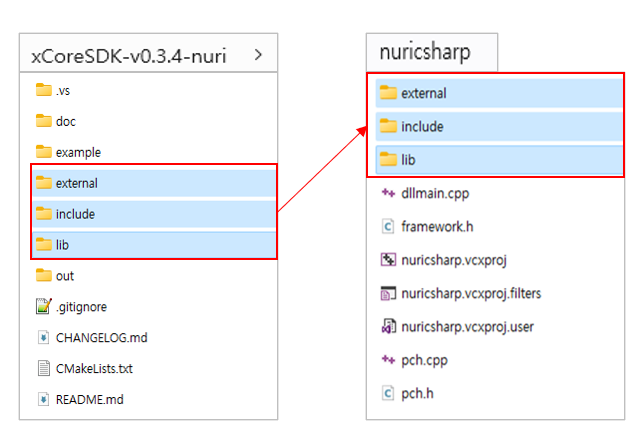
Once the project is created, you'll need to copy and paste the existing "external," "include," and "lib" folders from the NURI SDK into the folder where your solution is located, as shown in the image below. These folders contain the necessary files for using the C++ functions declared in the NURI SDK.
Just ensure that these folders are placed in the same directory as your solution for the C# project to access the required C++ files correctly.
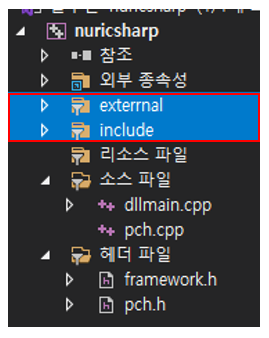
Next, you need to add the copied folders into your solution.
- Solution Explorer: Right-click on your solution name.
- Add > Existing Folder....
- Navigate to the location where you pasted the folders (external, include, lib), select them, and click Add.
Now, the folders should appear within your solution, making the C++ files accessible to your C# project.
Set Solution Properties
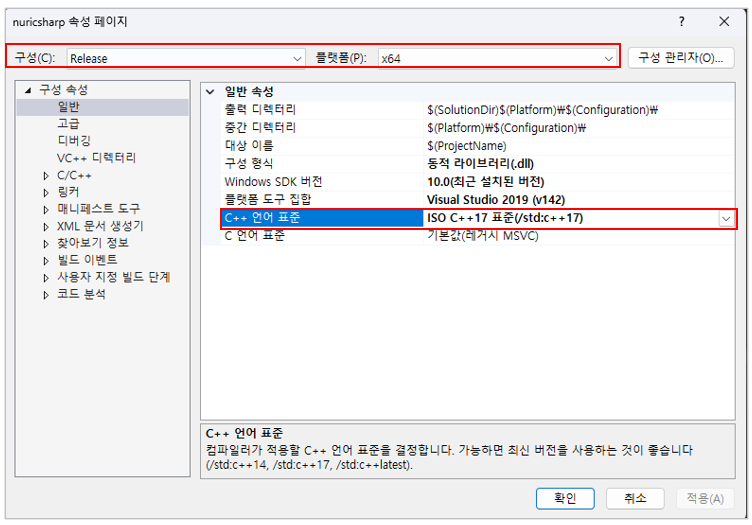
Once you've added the necessary files and folders to your project, you'll need to configure the solution properties for building. Regardless of whether your configuration environment is Release or Debug, since the NURI SDK is built for a 64-bit environment, you must set the platform to x64. Below are the steps for configuring the solution properties in the scenario where the configuration environment is set to Release and the platform is set to x64:
- Configuration Properties -> General -> C++ Language Standard -> ISO C++17 Standard (/std++17)
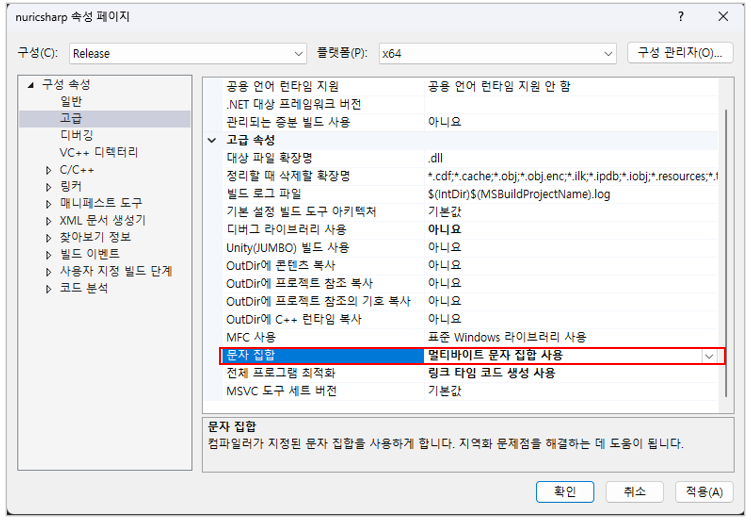
- Configuration Properties -> Advanced -> Character Set -> Use Multi-Byte Character Set
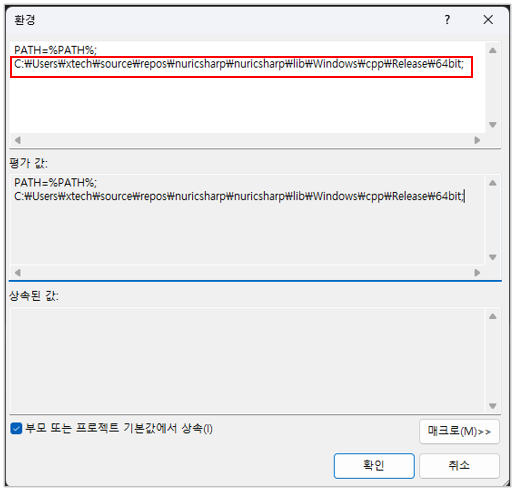
- Configuration Properties -> Debugging -> Environment -> your\project\path\lib\Windows\cpp\Release\64bit;
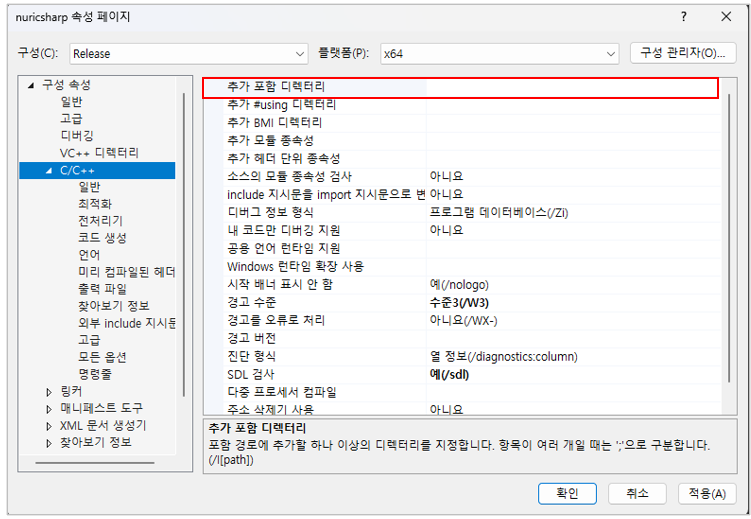
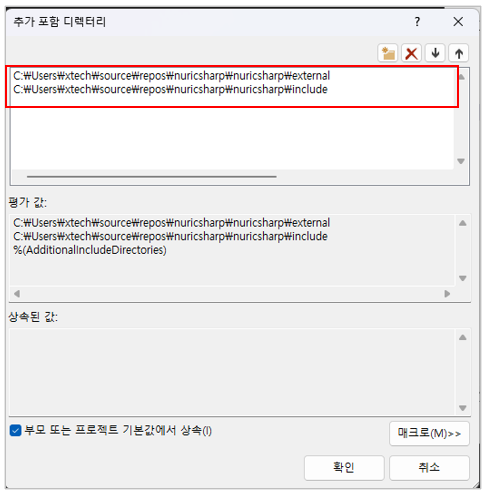
- Configuration Properties -> C/C++ -> Additional Include Directories -> your\project\path\external, your\project\path\include
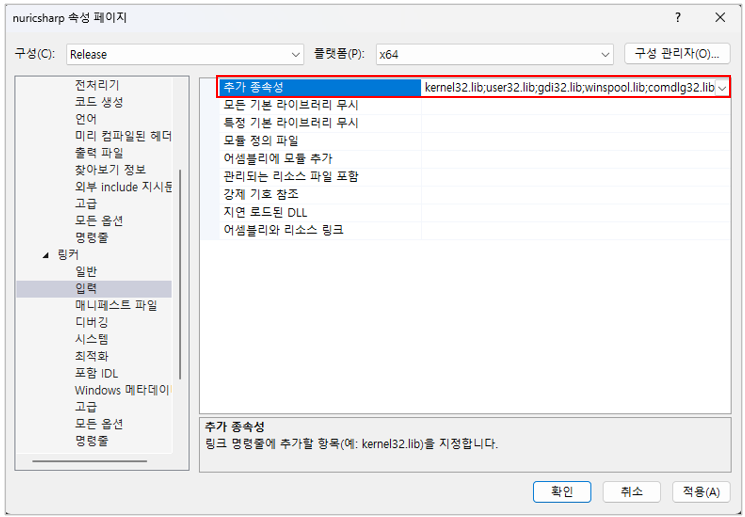
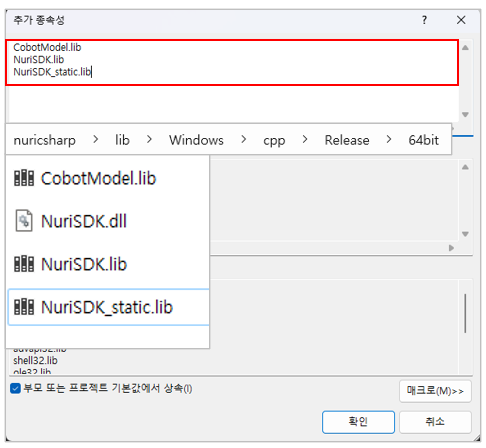
- Configuration Properties -> Linker -> Input -> Additional Dependencies -> your\project\path\lib\Windows\cpp\Release\64bit\ enter the name of the *.lib
Once you have configured up to this point, press the Apply button to complete the settings.
Function Writing
Create header (.h) and source (.cpp) files, then define the functions to be used in the C# environment.
To use C++ functions, you need to declare them with __declspec(dllexport) to make them accessible from other modules. Here, for simplicity, we'll declare it with a user-defined name 'NURI_API' in the header (.h) file.
The contents of the header (.h) file would include:
#pragma once

#ifdef NURICSHARP_EXPORTS
#define NURI_API        __declspec(dllexport)
#else
#define NURI_API        __declspec(dllimport)
#endif
Users can create or define functions as needed within the extern "C" block to ensure they can be called from external environments like C#.
The contents of the source (.cpp) file would include the implementation of the functions declared in the header file. Here's an example:
#include "pch.h"
#include "stdio.h"
#include "nuri.h"
#include <iostream>
#include <thread>
#include <string>
#include "include/nuri/base.h"
#include "include/nuri/model.h"
#include "include/nuri/robot.h"
#include "include/nuri/utility.h"
#pragma warning(disable:4996)

using namespace nuri;
NuriRobot* robot;

std::error_code ec;
std::string id;
extern "C"
{
    /* ===================================================
    @brief Function for connection with robot
    @return Success : 0 / Failed : -1
    @param [in]ip       연결할 로봇 IP
    =================================================== */
    NURI_API int connectRobot(const char* ip)
    {
        try
        {
            std::string ipAddress = ip;

            robot = new nuri::NuriRobot(ipAddress);

            return 0;
        }
        catch (const std::exception& e)
        {
            return -1;
        }
    }

    /* ===================================================
    @brief Function to disconnect from the robot
    @return Success : 0 / Failed : -1
    =================================================== */
    NURI_API int disconnectFromRobot()
    {
        try
        {
            robot->disconnectFromRobot(ec);

            return 0;

        }
        catch (const std::exception& e)
        {
            return -1;
        }
    }

    /* ===================================================
    @brief Move J (joint Motion)
    @return Success : 0 / Failed : -1
    @param [in] array   Target position
           [in] length  Array size
           [in] speed   Motion speed
           [in] radius
    =================================================== */
    NURI_API int addMoveAbsJ(double* array, int length, int speed, int radius)
    {
        try {
            JointPosition jointPos(std::vector<double>(array, array + length));
            MoveAbsJCommand moveAbsJCommand(jointPos, speed, radius);
            robot->moveAppend({ moveAbsJCommand }, id, ec);

            return 0;

        }
        catch (const std::exception& e) {
            return -1;
        }
    }

  /* ===================================================
    @brief Motion mode setting
    @param [in]motionControlMode
        Idle = 0,
        NrtCommand = 1,
        NrtRLTask = 2,
        RtCommand = 3
    =================================================== */
    NURI_API int setMotionControlMode(int motionControlMode)
    {
        try
        {
            robot->setMotionControlMode(static_cast<MotionControlMode>(motionControlMode), ec);

            return 0;
        }
        catch (const std::exception& e) {
            return -1;
        }
    }

    /* ===================================================
    @brief Motor state setting
    @return Success : 0 / Failed : -1
    @param [in] on : true Motor on / false Motor off
    =================================================== */
    NURI_API int setPowerState(bool on)
    {
        try
        {
            robot->setPowerState(on, ec);

            return 0;
        }
        catch (const std::exception& e) {
            return -1;
        }
    }

    /* ===================================================
    @brief Motion play
    @return Success : 0 / Failed : -1
    =================================================== */
    NURI_API int moveStart()
    {
        try
        {
            robot->moveStart(ec);

            return 0;
        }
        catch (const std::exception& e) {
            return -1;
        }
    }

    /* ===================================================
    @brief Motion stop
    @return Success : 0 / Failed : -1
    =================================================== */
    NURI_API int stop()
    {
        try
        {
            robot->stop(ec);

            return 0;
        }
        catch (const std::exception& e) {
            return -1;
        }
    }

    /* ===================================================
    @brief Motion Reset
    @return Success : 0 / Failed : -1
    =================================================== */
    NURI_API int moveReset()
    {
        try
        {
            robot->moveReset(ec);

            return 0;
        }
        catch (const std::exception& e) {
            return -1;
        }
    }

    /* ===================================================
    @brief Operate mode setting
    @param [in]operateMode
        manual    = 0,      ///< manual
        automatic = 1,      ///< automatic
        unknown   = Unknown ///< Unknown (abnormalities occurred)
    =================================================== */
    NURI_API int setOperateMode(int operateMode)
    {
        try
        {
            robot->setOperateMode(static_cast<OperateMode>(operateMode), ec);

            return 0;
        }
        catch (const std::exception& e) {
            return -1;
        }
    }

    /* ===================================================
    @brief Current operation state check
    =================================================== */
    NURI_API int operationState()
    {
        switch (robot->operationState(ec))
        {
        case OperationState::idle:
            return 0;

        case OperationState::jog:
            return 1;

        case OperationState::rtControlling:
            return 2;

        case OperationState::drag:
            return 3;

        case OperationState::rlProgram:
            return 4;

        case OperationState::demo:
            return 5;

        case OperationState::dynamicIdentify:
            return 6;

        case OperationState::frictionIdentify:
            return 7;

        case OperationState::loadIdentify:
            return 8;

        case OperationState::moving:
            return 9;

        default: // OperationState::unknown:
            return -1;
        }
    }
}
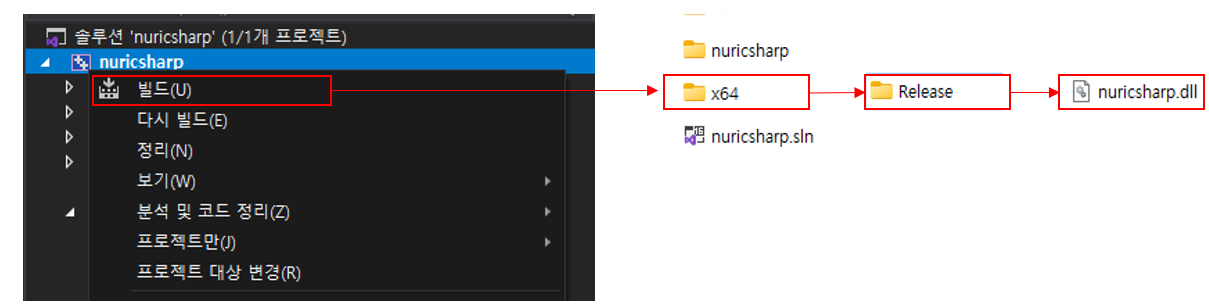
Once you have finished writing the function, you can build the solution to generate the projectname.dll file
Use in a C# environment
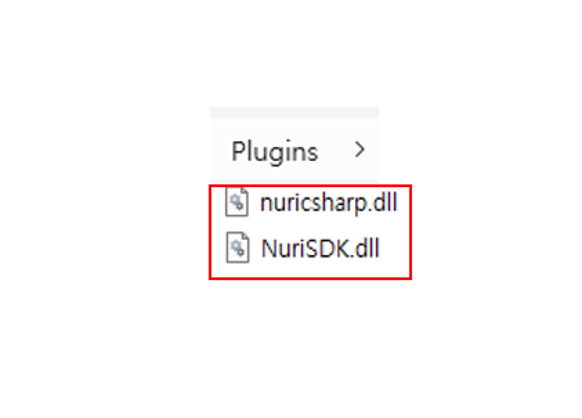
In the previous steps, if you have generated a .dll file, you now need to move that file into the C# folder where you intend to use it. The generated .dll file is designed to call functions within the NuriSDK.dll file, so ensure you also move the NuriSDK.dll file into the same C# folder. In this example, since Unity is used, you should copy these files under the Plugins folder.
For a typical C# project, you would copy the .dll file into either the Release or Debug folder within your project directory.
After moving the files, you can write code to call the functions you declared. In C#, to use DllImport, you need to declare System.Runtime.InteropServices.
After that, you need to declare the names of the functions created in the DLL. When declaring functions, make sure to match the function names, return values, and types and number of arguments used in the DLL.
[DllImport("nuricsharp")]
public static extern int connectRobot(string ip);

[DllImport("nuricsharp")]
public static extern int disconnectFromRobot();

[DllImport("nuricsharp")]
public static extern int addMoveAbsJ(IntPtr array, int length, int speed, int radius);

[DllImport("nuricsharp")]
public static extern int setMotionControlMode(int motionControlMode);

[DllImport("nuricsharp")]
public static extern int setPowerState(bool on);
...
Below is an example usage including MoveAbsJ motion playback.
using System;
using System.Collections.Generic;
using System.Runtime.InteropServices;
using System.Threading;
using UnityEngine;

public class nuricsharp
{
    [DllImport("nuricsharp")]
    public static extern int connectRobot(string ip);

    [DllImport("nuricsharp")]
    public static extern int disconnectFromRobot();

    [DllImport("nuricsharp")]
    public static extern int setPowerState(bool on);

    [DllImport("nuricsharp")]
    public static extern int setMotionControlMode(int motionControlMode);

    [DllImport("nuricsharp")]
    public static extern int setOperateMode(int operateMode);

    [DllImport("nuricsharp")]
    public static extern int addMoveAbsJ(IntPtr array, int length, int speed, int radius);

    [DllImport("nuricsharp")]
    public static extern int moveStart();

    [DllImport("nuricsharp")]
    public static extern int stop();

    [DllImport("nuricsharp")]
    public static extern int operationState();
}

public enum OperateMode
{
    manual = 0,
    automatic = 1,
    unknown = -1
}

public enum MotionControlMode
{
    Idle = 0,
    NrtCommand = 1,
    NrtRLTask = 2,
    RtCommand = 3
}

public class NuriSDKTest : MonoBehaviour
{
    // Start is called before the first frame update
    void Start()
    {

    }

    // Update is called once per frame
    void Update()
    {

    }

    public void OnClick()
    {
        string ip = "192.168.20.3";
        int res;

        // connect to robot
        res = nuricsharp.connectRobot(ip);

        // If the connection fails, no further progress is made
        if (!res.Equals(0))
        {
            Debug.Log("failed");
            return;
        }

        // Set to Nrtcommand mode for motion playback
        nuricsharp.setMotionControlMode((int)MotionControlMode.NrtCommand);

        // Operation mode must be automatic to turn on the motor
        nuricsharp.setOperateMode((int)OperateMode.automatic);

        // Motor ON
        nuricsharp.setPowerState(true);

        // Motion setting
        // All lengths are m and angles are radian reference.
        List<double> target = new List<double>() { -0.3452, -0.0213, -1.74533, 0.0159, -1.570, 0 };
        double[] array = target.ToArray();
        GCHandle gch = GCHandle.Alloc(array, GCHandleType.Pinned);

        try
        {
            IntPtr pointer = gch.AddrOfPinnedObject();
            res = nuricsharp.addMoveAbsJ(pointer, array.Length, 500, 0);
        }
        finally
        {
            gch.Free();
        }

        // Motion play
        res = nuricsharp.moveStart();
        if (!res.Equals(0))
        {
            Debug.Log("failed : " + res);
            return;
        }

        // Wait until the motion is over
        waitRobot();

        // After completing the motion
        // Motor OFF
        nuricsharp.setPowerState(false);

        // Operation Mode Set to Manual Mode
        nuricsharp.setOperateMode((int)OperateMode.manual);


        // Disconnecting the robot
        nuricsharp.disconnectFromRobot();
    }

    // Determine if the motion is in progress
    public void waitRobot()
    {
        Thread.Sleep(2000);
        bool running = true;
        while(running)
        {
            int res = nuricsharp.operationState();
            if(res.Equals(0) || res.Equals(-1))
            {
                running = false;
            }
        }
    }
}
For detailed information on the NURI SDK, please refer to the SDK manual.
Sdk
PDF version of the user manual is provided at the time of robot purchase. Customers who did not receive a manual or have lost it can request one via the email below. sales@neuromeka.com
